Blog

  • Pumpkin Pie with Chocolate Whip for Holidays

    Pumpkin Pie with Chocolate Whip for Holidays

    🎃 Decadent Pumpkin Pie with Silky Chocolate Whipped Cream

    The Pumpkin Pie with Chocolate Whip is show-stopping dessert that blends timeless pumpkin pie flavors with a rich chocolate finish. The filling is warmly spiced and luxuriously creamy, all nestled in a buttery crust. Topped with velvety cocoa-kissed whipped cream, this pie is ideal for holiday gatherings or anytime you want a spectacular sweet ending.

    .

    🎃Classic Pumpkin Pie with Chocolate Whip

    Recipe by Cindy
    0.0 from 0 votes
    Course: DessertCuisine: AmericanDifficulty: Easy
    Servings

    8

    slices
    Prep time

    30

    minutes
    Cooking time

    1

    hour 

    Ingredients

    • Pie Crust
    • 2 1/2 cups all-purpose flour

    • 2 tablespoons granulated sugar

    • 3/4 teaspoon salt

    • 1 cup (2 sticks) unsalted butter, cold and cubed

    • 1/2 cup cold buttermilk, plus 2–3 tablespoons more if needed

    • Pumpkin Filling
    • 2 cups pumpkin puree

    • 1/2 cup light brown sugar, packed

    • 1/4 cup granulated sugar

    • 2 teaspoons ground cinnamon

    • 1 teaspoon ground ginger

    • 1/2 teaspoon freshly grated nutmeg

    • 1/2 teaspoon allspice

    • 1/4 teaspoon ground cloves

    • 1/4 teaspoon ground cardamom

    • 1/4 teaspoon salt

    • 1 1/4 cups cold heavy cream

    • 2 large eggs, lightly beaten

    • 1 teaspoon vanilla extract

    • Chocolate Whipped Cream
    • 1 1/2 cups cold heavy whipping cream

    • 1/3 cup cocoa powder

    • 1/3 cup powdered sugar

    • Pinch of salt

    • Chocolate shavings or sprinkles (optional)

    Directions

    • Pie Crust
    • In a bowl, whisk flour, sugar, and salt.
    • Add butter and work it in with fingers until pea-sized pieces form.
    • Stir in buttermilk until dough becomes shaggy.
    • Turn onto floured surface, gently knead until combined.
    • Divide into two disks, wrap, and refrigerate at least 1 hour.
    • Roll one disk into a 13-inch circle and fit into a 9-inch deep pie dish. Chill.
    • Pumpkin Filling
    • Preheat oven to 400°F (200°C).
    • In a saucepan, combine pumpkin, both sugars, spices, and salt.
    • Cook over medium heat, stirring, until thick and fragrant (5–7 minutes).
    • Transfer to bowl; cool slightly.
    • Stir in cream, then whisk in eggs and vanilla until smooth.
    • Baking
    • Pour filling into chilled crust.
    • Bake at 400°F for 15 minutes.
    • Reduce temperature to 350°F (175°C) and bake 35–45 minutes, until center is set.
    • Cool completely, then refrigerate overnight for best texture.
    • Chocolate Whipped Cream
    • Whisk 1/2 cup cream with cocoa powder, powdered sugar, and salt until smooth.
    • Add remaining cream and whip to soft peaks.
    • Spread or dollop over chilled pie. Garnish if desired.
    Pumpkin Pie with Chocolate Whip

    🛒 Ingredients

    For the Pie Crust

    • 2 1/2 cups all-purpose flour
    • 2 tablespoons granulated sugar
    • 3/4 teaspoon salt
    • 1 cup (2 sticks) unsalted butter, cold and cut into cubes
    • 1/2 cup cold buttermilk, plus an extra 2–3 tablespoons if the dough feels dry

    The Pumpkin Filling

    • 2 cups smooth pureed pumpkin
    • 1/2 cup packed light brown sugar
    • 1/4 cup granulated sugar
    • 2 teaspoons ground cinnamon
    • 1 teaspoon ground ginger
    • 1/2 teaspoon freshly grated nutmeg
    • 1/2 teaspoon allspice
    • 1/4 teaspoon ground cloves
    • 1/4 teaspoon ground cardamom
    • 1/4 teaspoon salt
    • 1 1/4 cups cold heavy cream
    • 2 large eggs, lightly beaten
    • 1 teaspoon pure vanilla extract

    For the Chocolate Whipped Cream

    • 1 1/2 cups cold heavy whipping cream
    • 1/3 cup cocoa powder
    • 1/3 cup powdered sugar
    • Pinch of salt
    • Chocolate shavings or sprinkles for finish

    👩‍🍳 Instructions

    1. Start the Pie Dough

    1. In a medium bowl, whisk together the flour, sugar, and salt.
    2. Add the cold butter cubes and use your fingers to mix until the pieces resemble uneven flakes and peas.
    3. Make a small well in the mixture and pour in the cold buttermilk. Mix with a fork until the flour is moistened and it becomes a shaggy dough.
    4. Turn the mixture onto a lightly floured surface. Gently knead just until it comes together.
    5. Divide into two disks, wrap individually, and refrigerate for at least 1 hour. (You’ll only use one; freeze the other for later.)

    2. Roll Out the Crust

    1. On a floured surface, roll one dough disk into about a 13-inch circle. Move the dough as you roll to prevent sticking — perfection isn’t required here!
    2. Lift and center the dough into a 9-inch deep pie plate. Press gently into place. Chill in the fridge while you make the filling.

    3. Make the Pumpkin Filling

    1. Place a rack in the center of the oven and preheat to 400°F (200°C).
    2. In a medium saucepan, combine the pumpkin puree, both sugars, and all the spices including salt.
    3. Cook over medium heat, stirring occasionally, until the mixture becomes fragrant and begins to bubble — about 5–7 minutes.
    4. Transfer to a bowl and let cool slightly. Stir in the heavy cream, then whisk in the beaten eggs and vanilla until smooth.

    4. Bake the Pie

    1. Pour the pumpkin batter into the chilled crust.
    2. Bake at 400°F for 15 minutes.
    3. Reduce the oven temperature to 350°F (175°C) and continue baking until the center is set and doesn’t jiggle — about 35–45 minutes.
    4. Let the pie cool completely. For best texture, refrigerate overnight so the custard fully sets.

    5. Prepare the Chocolate Whipped Cream

    1. In a medium bowl whisk 1/2 cup of heavy cream with the cocoa powder, powdered sugar, and salt until smooth.
    2. Add the remaining 1 cup of cold cream and whip with a mixer until soft peaks form.
    3. Spoon or dollop over the chilled pie. Sprinkle with chocolate shavings or sprinkles. Chill until serving.

    💡 Pro Tips

    • Keep everything cold: Cold butter and cream help make a flakier crust and a better-textured whipped cream.
    • Don’t overwork the dough: Handle the crust as little as possible — overworking can make it tough.
    • Spice balance: The blend of cinnamon, ginger, nutmeg, and warm spices gives classic flavor — but you can adjust to your taste.
    • Look for set edges: The pie is done when the center is just set and not overly wobbly — carryover heat will finish it.

    🥶 Make-Ahead & Storage

    • Bake in advance: You can bake the pie up to one day ahead and chill overnight before adding the whipped topping.
    • Whipped cream timing: For the freshest, lightest texture, make the chocolate whipped cream just before serving.
    • Storage: Cover the pie and keep refrigerated up to 3–4 days. Leftovers are delicious cold!
    • Freeze option: The unfilled crust dough, wrapped tightly, can be frozen up to 3 months.

    🍽️ Serving Suggestions

    This Classic Pumpkin Pie with Chocolate Whip is a show-stopping dessert for fall and winter celebrations. Serve it slightly chilled or at room temperature for the best texture and flavor. For extra indulgence, add a drizzle of warm chocolate sauce, caramel, or maple syrup just before serving.

    Perfect for Thanksgiving, Christmas, Friendsgiving, and autumn dinner parties, this pie pairs beautifully with a cup of coffee, chai latte, or spiced tea. Garnish with extra chocolate shavings, a dusting of cocoa powder, or crushed pecans for an elegant seasonal touch.

    🥗 Health & Nutrition Notes

    Pumpkin is naturally rich in fiber, vitamin A, and antioxidants, making this dessert more nourishing than many traditional pies. Using real pumpkin purĂŠe adds nutrients while keeping the filling creamy and satisfying.

    To lighten the recipe, you can:

    • Use dark chocolate for the whipped topping (higher antioxidants)
    • Reduce added sugar slightly without affecting flavor
    • Serve smaller slices, as this pie is rich and filling

    While still an indulgent treat, this pumpkin pie offers a comforting balance of flavor and nutrition when enjoyed in moderation.

    Note: For more informations on nutrition, visit the website: nutrition.gov or MyPlate.gov | U.S. Department of Agriculture

    ❓ FAQs

    Can I make this pumpkin pie ahead of time?

    Yes! This pie can be made 1–2 days in advance. Store it covered in the refrigerator and add the chocolate whip topping shortly before serving for the best texture.

    Can I freeze pumpkin pie?

    Yes, the Pumpkin Pie with Chocolate Whip (without the chocolate whip) freezes well for up to 2 months. Thaw overnight in the refrigerator and top with fresh chocolate whipped cream before serving.

    Can I use canned pumpkin?

    Absolutely. Use 100% pure pumpkin purĂŠe, not pumpkin pie filling, for the best results.

    What can I substitute for chocolate whip?

    Classic whipped cream, cinnamon whipped cream, or maple whipped cream all work beautifully if you prefer a non-chocolate topping.

    Before You Go Enjoying Pumpkin Pie with Chocolate Whip

    If you enjoyed this Chocolate Christmas Candy recipe, explore other holiday treats on the site. Follow along on Pinterest at https://www.pinterest.com/smart_s4/ for daily inspiration. Share your candy photos and results with friends. Cooking feels better when everyone joins in.

  • Chocolate Christmas Candy Recipe

    Chocolate Christmas Candy Recipe

    Chocolate Christmas Candy Recipe for Festive Holiday Treats

    Chocolate Christmas Candy always shows up when the holidays feel close enough to taste. This easy holiday chocolate christmas candy recipe brings that cheerful, cozy feeling without stress. Because it needs no baking, it fits busy December schedules perfectly. You melt, sprinkle, chill, and snack. Simple as that. Chocolate Christmas Candy also works beautifully for gifting, party platters, or late night cravings. Every bite delivers creamy chocolate with festive crunch. Even better, kids can help without turning the kitchen upside down.

    Reasons You’ll Love This Chocolate Christmas Candy Recipe

    Chocolate Christmas Candy checks every holiday box fast. First, it uses just a few pantry friendly ingredients. Because of that, last minute prep feels doable. Also, the candy looks festive without fancy tools. Red, green, and white sprinkles add instant cheer. Meanwhile, the chocolate flavor stays rich and comforting.

    What Makes a Good Chocolate Christmas Candy

    A good Chocolate Christmas Candy recipe relies on smooth melted chocolate and balanced toppings. Chocolate quality matters, so melting wafers or good chips help avoid grainy texture. At the same time, toppings should add crunch without overpowering sweetness.
    Temperature also plays a big role. Chocolate Christmas Candy sets best when the room stays cool and dry. Because of that, candy holds its shape and shine. Portion size matters too. Smaller candies set evenly and look more polished. Finally, spacing toppings evenly keeps every bite exciting and festive.

    Chocolate Christmas Candy

    Recipe by Cindy
    0.0 from 0 votes
    Course: DessertCuisine: AmericanDifficulty: Easy
    Servings

    24

    candies
    Prep time

    15

    minutes
    Cooking timeminutes
    Calories per serving

    140

    kcal

    Ingredients

    • 2 cups semi-sweet melting chocolates

    • 2 cups white chocolate melting wafers

    • ½ cup white nonpareil sprinkles

    • ½ cup red, green, and white nonpareil sprinkles

    • ½ cup crushed candy canes

    Directions

    • Prepare your sprinkles. Arrange the white, colored, and crushed candy canes in separate shallow dishes or in rows within a deep plate. Make sure they’re spread evenly and about Âź inch deep.
    • Melt the first chocolate. In a microwave-safe bowl, melt the semi-sweet chocolate following the package directions. Stir every 20–30 seconds until smooth.
    • Pipe the chocolate. Transfer the melted chocolate into a piping or zip-lock bag, snip a small hole in the corner, and pipe small ½-inch circles directly onto the sprinkles.
    • Let them set. Allow the chocolate to harden for about 5 minutes. To speed it up, pop the dish into the fridge for a minute or two.
    • Remove the candy. Once firm, gently lift each candy out using a fork and transfer them to a tray or container.
    • Repeat. Melt the white chocolate next and repeat the process over a different sprinkle row.
    • Finish and enjoy. Let them cool completely, then package them up in jars or treat bags. Perfect for gifting or snacking right away!

    Storage and Health Tips

    Store Chocolate Christmas Candy in airtight containers. Keep at room temperature for up to two weeks. Refrigeration extends shelf life to four weeks. Freeze candy for up to five months if wrapped tightly.
    For health balance, enjoy small portions. Drink water alongside sweets. Sharing candy with friends also keeps indulgence lighthearted and social.

    Nutritional Insights

    Chocolate Christmas Candy remains a treat, so moderation matters. Each serving delivers energy from sugars and fats. Semi sweet chocolate offers antioxidants, while white chocolate focuses on creaminess.
    Candy canes add small amounts of sugar without much fat. Portion control helps balance indulgence with enjoyment. Pairing candy with fresh fruit or nuts during snack time can help offset sweetness while keeping festive vibes.

    FAQs

    –Can I use chocolate chips instead of wafers
    Yes, but add a teaspoon of coconut oil per cup for smoother melting.
    –Why did my chocolate turn grainy
    Moisture or overheating often causes grainy texture.
    –Can kids help make Chocolate Christmas Candy
    Absolutely, kids love sprinkling toppings.
    –How long does Chocolate Christmas Candy last
    Up to two weeks at room temperature when sealed.
    –Can I freeze Chocolate Christmas Candy
    Yes, freeze for long term storage.

    Before You Go Enjoying Chocolate Christmas Candy

    If you enjoyed this Chocolate Christmas Candy recipe, explore other holiday treats on the site. Follow along on Pinterest at https://www.pinterest.com/smart_s4/ for daily inspiration. Share your candy photos and results with friends. Cooking feels better when everyone joins in.

    Note: For more informations on nutrition, visit the website: nutrition.gov or MyPlate.gov | U.S. Department of Agriculture

  • Christmas Sugar Cookie Bars

    Christmas Sugar Cookie Bars

    Introduction

    Christmas Sugar Cookie Bars are pure holiday happiness on a plate. These soft, buttery bars are topped with creamy buttercream frosting and festive red, green, and white sprinkles that make every bite feel merry. They blend classic sugar cookie flavor with effortless bar baking, so no cookie cutters, no chilling, and no fuss. Perfect for sharing with family, baking with kids, or bringing to parties, these bars are quick to make and loved by all.

    History of Christmas Sugar Cookie Bars

    Traditional sugar cookies date back to 1700s Europe, especially celebrated by German settlers in America centuries ago. These simple cookies of flour, butter, and sugar became a staple of holiday festivities. Over time, bakers began adapting old favorites for easier baking, leading to cookie bars that skip shaping and cutting. By pressing dough into a pan and frosting it, holiday bakers could enjoy soft, rich treats faster than individual cookies. Christmas Sugar Cookie Bars evolved as a fun twist on a cherished classic, blending long-standing cookie traditions with convenience and festive decoration.

    Reasons You’ll Love This Christmas Sugar Cookie Bars Recipe

    You’re going to adore these Christmas Sugar Cookie Bars because they make holiday baking simple yet totally delicious. First off, they’re easy enough for beginner bakers, but still impress your guests with rich flavor and pretty presentation. Because you bake them all at once in one pan, cleanup is much easier than classic cut-out cookies. Each bar stays soft and tender, thanks to a little trick ingredient that keeps them moist and pillowy. The frosting is creamy and fluffy without being overly sweet, and those festive sprinkles instantly give holiday cheer. These bars travel well to cookie swaps and look gorgeous on a dessert tray. Plus they taste even better the next day, so you can bake ahead and stress less.

    What Makes a Good Christmas Sugar Cookie Bars

    A good Christmas Sugar Cookie Bars should be soft, buttery, and melt in your mouth. Texture matters most, so these bars are light yet dense enough to hold frosting without crumbling. A touch of cornstarch adds extra softness, keeping them tender bite after bite. The buttercream frosting should be thick and creamy, not runny or gritty, and festive sprinkles add a fun crunch. Good balance of vanilla and almond extracts gives them a familiar, comforting aroma. A perfect bar takes classic sugar cookie flavor and makes it easier to share with a crowd.

    Soft, melt-in-your-mouth bars 

    Recipe by Cindy
    0.0 from 0 votes
    Course: DessertCuisine: AmericanDifficulty: Easy
    Servings

    16

    bars
    Prep time

    15

    minutes
    Cooking time

    25

    minutes
    Calories per bar

    420

    kcal

    Ingredients

    • Sugar Cookie Bars

    • • 2 cups all purpose flour

    • • 2 teaspoons cornstarch

    • • 1 teaspoon baking powder

    • • 3/4 cup salted butter, softened

    • • 1 cup granulated sugar

    • • 1 tablespoon vanilla extract

    • • 1 teaspoon almond extract

    • • 2 large eggs

    • • 4 tablespoons Christmas sprinkles

    • Buttercream Frosting

    • • 1 cup salted butter, softened

    • • 2 1/2 cups powdered sugar

    • • 4 to 5 tablespoons heavy cream

    • • 1 teaspoon clear vanilla extract

    • • 1/2 teaspoon almond extract

    • • Extra Christmas sprinkles

    Directions

    • Preheat oven to 350°F and line a 9×9 baking pan with parchment paper.
    • Whisk flour, cornstarch, and baking powder in a bowl.
    • Beat butter until creamy, then mix in sugar and extracts.
    • Add eggs one at a time, mixing well.
    • Slowly mix in dry ingredients until combined.
    • Fold in sprinkles gently.
    • Spread dough evenly into pan.
    • Bake for 20 to 22 minutes until edges turn lightly golden.
    • Cool completely before frosting.
    • Beat frosting ingredients until smooth and fluffy.
    • Spread frosting over bars and decorate with sprinkles.
    • Slice and serve.
    Christmas Sugar Cookie Bars ingredients

    Equipment

    • Mixing bowls for prep
    • Hand or stand mixer for easy creaming
    • 9×9-inch baking dish
    • Parchment paper for easy removal
    • Silicone spatula or offset spatula

    Detailed instructions

    1. Preheat oven to 350°F and line a 9×9-inch baking dish with parchment paper, leaving an overhang so you can easily lift the bars later. Lightly spray the pan to prevent sticking.
    2. In a bowl whisk together flour, cornstarch, and baking powder. Set aside.
    3. In a mixing bowl beat softened butter on high for about a minute until creamy.
    4. Add granulated sugar, vanilla, and almond extract to the butter and beat until light and fluffy, about 1-1½ minutes.
    5. Reduce mixer speed to low and add eggs one at a time, beating after each.
    6. Gradually mix in the flour mixture on medium-low until just combined. throughout the dough.
    7. Spread the dough evenly into your prepared baking dish.
    8. Bake for 20-22 minutes, until the edges turn slightly golden and a toothpick comes out clean from the center.
    9. Let the cookie bars cool completely in the pan before frosting so the buttercream doesn’t melt.
    10. For the frosting, beat softened butter, vanilla, and almond extract until creamy.
    11. Slowly add powdered sugar, alternating with heavy cream, and beat until smooth and fluffy.
    12. Lift the cooled bars using the parchment, spread frosting evenly over the top, and sprinkle extra nonpareils before slicing into bars.

    How to Tell When Christmas Sugar Cookie Bars Are Done

    You’ll know they’re finished when the edges look just a hint of golden, while the center stays lighter in color. A clean or slightly crumbly toothpick from the center means they’re ready. Don’t wait for dark browning or you’ll lose that tender texture. These bars continue to set as they cool, so remove them from the oven at the right moment and let them finish baking off-heat.

    Christmas Sugar Cookie Bars ready

    Variations & Toppings

    You can easily mix up these Christmas Sugar Cookie Bars for different holiday vibes. For a chocolate twist, add white chocolate chips or drizzle melted chocolate after frosting. Peppermint lovers can fold in crushed candy canes or swap almond extract for peppermint. For more spice, try a bit of orange zest or cinnamon in the dough. You can also switch up sprinkle colors for birthdays or other holidays, making pastel sprinkles for Easter or red hearts for Valentine’s. Edible sugar pearls or sanding sugar give extra sparkle if you want bakery-style bars.

    Nutritional Insights

    Each of these bars clocks in around 420 calories with about 49g carbs and 24g fat per serving. Butter contributes richness and caloric density, while eggs add a small amount of protein. Because they’re frosting-topped treats, they’re best enjoyed in moderation during holiday celebrations. If you want a lighter version, try reducing sugar slightly or using lower-fat dairy, though texture will adjust. Pairing a small bar with tea or fruit balances indulgence and enjoyment.

    Pro Tips and Tricks

    • Always measure flour correctly using spoon-and-level to avoid dry bars.
    • Use room temperature butter and eggs for the easiest mixing.
    • Cornstarch is key to the softest, most tender bars.
    • Cool completely before frosting so it stays thick and pretty.
    • A hot knife (warmed in hot water and wiped dry) gives clean slice edges.
    • Store in an airtight container to keep them soft for days.

    My Takes On Christmas Sugar Cookie Bars

    These bars are my holiday go-to because they bring classic sugar cookie flavors without all the extra work. I love how quick they come together and how festive they look when frosted and sprinkled. The buttercream feels rich but not too sweet, and the almond extract makes my kitchen smell like Christmas every time. They’re the easiest way to impress a crowd with minimal effort.

    Storage & Health Tips

    Store leftover Christmas Sugar Cookie Bars in an airtight container on the counter for up to three days, or in the fridge for up to five. You can freeze unfrosted bars for up to two months—wrap them well and thaw before frosting. For slightly healthier swaps, use unsweetened sprinkles, reduce sugar by a tablespoon or two, or mix half whole wheat pastry flour with all-purpose. Those small changes cut a bit of sugar and add fiber without losing softness.

    FAQs

    1. Can I make Christmas Sugar Cookie Bars ahead? Yes, they hold up well and even taste better the next day.
    2. Can I use unsalted butter? Yes, just add a pinch of salt to the dough and frosting.
    3. Why is my frosting too thick? Add heavy cream a tablespoon at a time until you reach your desired spread.
    4. Can I double this recipe? You can, just use a 9×13 pan and increase bake time slightly.
    5. How do I cut clean bars? A warm knife gives the neatest edges.
    6. Can I skip almond extract? Yes, replace with extra vanilla if preferred.
    7. What food coloring works? Gel food coloring gives bright colors without thinning the frosting.
    8. Why did my bars turn dry? Overbaking or too much flour can dry them out.

    Before You Go

    Thanks for baking Christmas Sugar Cookie Bars with me today, and I hope they help make your holiday sweeter! If you loved this recipe, explore other dessert ideas and seasonal treats on my site. Head over to Pinterest for more inspiration, and don’t forget to share your photos and results with our warm community of bakers. Your creations make this space extra special!.

    Note: For more informations on nutrition, visit the website: nutrition.gov or MyPlate.gov | U.S. Department of Agriculture


  • Creamy Smothered Chicken and Rice

    Creamy Smothered Chicken and Rice

    Introduction

    Who doesn’t crave a warm, comforting dish that feels like a hug on a plate? Creamy Smothered Chicken and Rice delivers just that: tender, seasoned chicken bathed in a luscious sauce, served over fluffy rice. It’s straightforward enough for a weeknight, but with a flavor that feels special. Let’s jump in and explore why this recipe has earned a top spot in comfort-food lineups.

    Reasons You’ll Love This Recipe

    You’ll fall hard for this creamy smothered chicken and rice for so many reasons. First, it’s largely a one-pan (or one-skillet) wonder, fewer dishes, less cleanup. Many versions out there praise that very feature.
    Second, the sauce. Creamy, cheesy, flavorful, it wraps every bite in richness. Recipes often combine cream or sour cream with cheese, broth, and seasonings.
    Third, it’s flexible. Want more veggies? Stir in spinach or mushrooms. Prefer thighs to breasts? Swap them in. Many blogs encourage these custom tweaks.
    Finally, it’s family friendly. Kids and adults alike tend to love it. Plus, leftovers reheat beautifully, so you’ll enjoy it days after.

    What Makes a Good Creamy Smothered Chicken and Rice

    A top-notch creamy smothered chicken and rice has three pillars. First: juicy, well-seasoned chicken that didn’t dry out during simmering. Second: a sauce that’s rich and smooth, no lumps, not too thin, not too thick. Third: rice cooked so it remains slightly separate and fluffy, but also absorbs that sauce. Balance those three and you win.

    Cultural Significance of Creamy Smothered Chicken and Rice

    While this dish doesn’t have a single origin or deep historical tradition like some regional dishes, it sits squarely in the realm of American comfort food and “Southern-style” home cooking. The word “smothered” typically refers to cooking with a rich sauce that covers or “smothers” the protein, you see this method in Southern cuisine with smothered chicken, smothered pork chops, smothered greens. Over time, pairing that with rice and a creamy sauce has become a cozy staple in many homes. Its adaptability and comforting nature have helped it spread beyond any one locale.

    History of Creamy Smothered Chicken and Rice

    Tracing a precise history is tough because this recipe is more of a fusion of existing traditions. The “smothered” technique has roots in Southern US cooking, where meats are slow cooked in flavorful gravies. Over the decades, home cooks began combining that idea with creamy sauces (influenced by European styles) and serving it over starches like mashed potatoes, biscuits, or rice. As rice became more common in American households (especially mid-20th century onward), combining creamy, smothered proteins over rice became a natural evolution. In modern times, recipe bloggers adapted it with shortcuts, using cream, soups, sour cream, or pre-shredded cheese. That evolution turned it from a laborious Southern specialty into a weekday favorite across many kitchens.

    Creamy Smothered Chicken and Rice recipe ingredients

    Creamy Smothered Chicken and Rice

    Recipe by Cindy
    0.0 from 0 votes
    Course: DinnerCuisine: Southern, AmericanDifficulty: Easy
    Servings

    4

    servings
    Prep time

    15

    minutes
    Cooking time

    35

    minutes
    Calories

    650

    kcal

    Juicy chicken, tender rice, and a silky sauce.

    Ingredients

    • 4 boneless, skinless chicken breasts or thighs

    • 2 tbsp olive oil or butter

    • 1 medium onion, diced

    • 3 cloves garlic, minced

    • 1½ cups long-grain white rice (uncooked)

    • 2 cups chicken broth

    • 1 cup heavy cream or half-and-half

    • 1 can cream of chicken soup (optional)

    • 1 tsp garlic powder

    • 1 tsp onion powder

    • ½ tsp paprika

    • Salt and pepper, to taste

    • 1 tbsp flour or 1½ tsp cornstarch

    • ½ cup shredded cheddar cheese (optional)

    • 2 tbsp chopped parsley for garnish

    Directions

    • Season chicken with salt, pepper, paprika, and garlic powder.
    • Heat olive oil or butter in a skillet over medium-high heat.
    • Sear chicken 3–4 minutes per side until golden. Remove and set aside.
    • In the same pan, sautĂŠ onions for 3 minutes, then add garlic.
    • Stir in rice, toast lightly, and pour in chicken broth.
    • In a small bowl, whisk flour or cornstarch into cream, then pour into skillet.
    • Return chicken to pan, cover, and simmer 15–20 minutes until rice is tender and chicken reaches 165°F.
    • Sprinkle cheese and parsley on top, cover for a few minutes to melt. Serve hot.

    Detailed instructions

    Follow these steps, adapting to your cooking style:

    1. Prep & Season Chicken
      Pat your chicken dry with paper towels. Season both sides with salt, pepper, garlic powder, onion powder, and paprika (or your spice mix).
    2. Sear the Chicken
      In a wide skillet over medium-high heat, warm olive oil (and/or butter). Place chicken in the pan and sear it 3 to 5 minutes per side until golden brown, it doesn’t need to be cooked through yet. Remove and set aside.
    3. SautĂŠ Aromatics
      In the same skillet, reduce heat to medium. Add diced onion and sautĂŠ until softened (about 3 minutes). Add minced garlic and, if using, mushrooms. Cook until fragrant and mushrooms begin to brown.
    4. Add Rice & Broth
      Stir in the uncooked rice and toast it lightly in the pan for a minute or two. Then pour in chicken broth (or mixture of broth + milk), stirring to combine. Scrape up browned bits from bottom, they add flavor.
    5. Make Creamy Sauce
      In a bowl, whisk flour (or cornstarch) into a small amount of milk or broth to make a slurry. Gradually pour that into the skillet liquid, whisking to prevent lumps. Then add cream, sour cream, or “cream of chicken soup” as your recipe allows. Stir until smooth and beginning to thicken.
    6. Return Chicken, Simmer
      Nestle the seared chicken back into the creamy rice mixture. Cover the skillet, reduce heat, and simmer gently for 10-15 minutes (or until rice is tender and chicken internal temp is reached). Stir gently if needed, being careful not to break up the rice too much or overload the sauce.
    7. Rest & Finish
      Once done, remove from heat and let the skillet rest for a few minutes, covered. That helps the flavors settle and gives rice a chance to finish absorbing. Sprinkle shredded cheese (cheddar or Parmesan) and chopped parsley over the top, cover briefly to melt cheese.
    8. Serve
      Plate the creamy smothered chicken and rice right away. Spoon extra creamy sauce over the top. Enjoy!
    Good Creamy Smothered Chicken and Rice

    How to Tell When Creamy Smothered Chicken and Rice Is Done

    You’ll know this dish is ready when two things line up: the chicken reaches a safe internal temperature of 165°F, and the rice is tender but not mushy. Stick a thermometer into the thickest part of the chicken to check doneness. The sauce should coat a spoon easily, with no chalky flour taste left. The rice should have absorbed most of the creamy liquid, leaving just enough to create a rich blanket over every bite. If the sauce looks too thin, simmer uncovered for a few more minutes.

    Variations and Toppings for Creamy Smothered Chicken and Rice

    This recipe is endlessly customizable, so go ahead and make it your own. Here are some fun twists that work beautifully:

    • Cheesy Ranch Style: Add a packet of ranch seasoning and use a blend of cheddar and Monterey Jack cheese.
    • Spinach Mushroom Upgrade: Stir in a handful of baby spinach and sautĂŠed mushrooms for an earthy, fresh touch.
    • Cajun Kick: Use Cajun or Creole seasoning instead of paprika and top with chopped green onions.
    • Lighter Option: Replace cream with evaporated milk or Greek yogurt. The result is still creamy but lighter.
    • Loaded Version: Sprinkle bacon bits, extra cheddar, and a dash of hot sauce before serving.

    Top your creamy smothered chicken and rice with parsley, sliced green onions, or even crispy onions for extra crunch. Each variation keeps the heart of the recipe intact while letting you mix up the flavor profile.

    Nutritional Insights

    Creamy smothered chicken and rice may be rich and hearty, but with a few tweaks, you can enjoy it in a balanced way. A typical serving (about one chicken breast with one cup of rice and sauce) comes in around 600–700 calories. Using skinless chicken breasts, low-sodium broth, and reduced-fat cream or Greek yogurt can cut that down significantly. You’ll still get a good dose of protein (roughly 35–40 grams per serving) along with carbs for energy. Add vegetables like peas, spinach, or carrots to sneak in extra nutrients and fiber. The dish can fit into a balanced meal plan with portion awareness and a side of fresh greens.

    Pro Tips and Tricks for Perfect Creamy Smothered Chicken and Rice

    Making this dish shine every time isn’t hard once you know a few insider moves:

    1. Use the Right Pan
      A wide, heavy-bottomed skillet helps rice cook evenly and prevents sticking. Avoid small, deep pots that trap steam and turn the rice gummy.
    2. Toast the Rice Briefly
      That short toasting step before adding liquid deepens the flavor and keeps grains separate.
    3. Simmer, Don’t Boil
      Boiling breaks down the cream and makes the sauce grainy. Keep it at a gentle simmer instead.
    4. Balance the Liquid
      Rice absorbs liquid differently depending on type. If using jasmine, reduce broth slightly. For basmati, you might need a splash more.
    5. Let It Rest
      Resting the finished dish (covered) for 5 to 10 minutes after cooking allows flavors to settle and sauce to thicken naturally.
    6. Add Cheese at the End
      If you add cheese too soon, it can separate. Sprinkle it in right after removing from heat and cover to melt gently.
    7. Batch Cooking Tip
      Double the recipe, freeze portions without the cheese topping, and reheat later for quick meals. Add a splash of milk when reheating to restore creaminess.

    These tricks turn a simple weeknight dinner into a creamy masterpiece that feels restaurant-level but is made right in your kitchen.

    My Take on Creamy Smothered Chicken and Rice

    This recipe reminds me of Sunday dinners at home, hearty, cozy, and satisfying. I prefer using chicken thighs because they stay juicy and rich. I also like to mix sharp cheddar with Parmesan for a bold flavor combo. Sometimes I stir in spinach right at the end for color and freshness. It’s the kind of meal that hits all the comfort notes while still being simple enough to make on a busy night.

    Storage and Health Tips

    Creamy smothered chicken and rice stores like a dream. Let it cool completely, then transfer leftovers to an airtight container. It’ll keep in the fridge for up to four days. For longer storage, freeze it in individual portions for up to three months. When reheating, add a splash of milk or broth to bring back the creamy texture.
    Health-wise, balance this rich dish with something light on the side, a green salad or roasted vegetables. If you’re watching sodium, use low-sodium broth and skip extra salt in the seasoning mix. You can also reduce calories by swapping heavy cream for half-and-half or using less cheese. The flavor stays satisfying, and you’ll still enjoy that silky sauce that makes this meal so irresistible.

    Frequently Asked Questions

    Can I use brown rice instead of white?
    Yes, but increase liquid and cooking time. Brown rice takes longer to soften, so add about ½ cup more broth and simmer an extra 15 to 20 minutes.

    Can I bake this dish instead of cooking on the stovetop?
    Absolutely. Combine everything in an oven-safe dish, cover tightly, and bake at 350°F for about 30 to 35 minutes. Check that the chicken hits 165°F before serving.

    What if my sauce turns out too thin?
    Simmer uncovered for a few minutes or whisk in a little cornstarch slurry to thicken. Avoid over-stirring to keep the rice intact.

    Can I make creamy smothered chicken and rice ahead of time?
    Yes. Cook as usual, let cool, and refrigerate. Reheat on low with a splash of milk or broth to keep it creamy.

    What’s the best cheese to use?
    Cheddar adds sharpness, Parmesan gives a nutty note, and mozzarella melts beautifully. A mix of cheddar and Parmesan is a popular favorite.

    Is this gluten-free?
    It can be. Use cornstarch instead of flour for thickening and make sure your broth and soup (if used) are labeled gluten-free.

    Can I add vegetables?
    Definitely. Peas, spinach, broccoli, or diced carrots work great. Stir them in during the last few minutes of cooking to keep them bright and tender.

    Can I make it dairy-free?
    Sure. Swap the cream for coconut milk or almond-based alternatives. The flavor will shift slightly, but it stays rich and satisfying.

    Before You Go

    If you’ve enjoyed this creamy smothered chicken and rice, I’d love for you to try more comfort-food favorites on my site. Don’t forget to follow along on Pinterest for new recipe inspiration and share your kitchen results. Snap a photo, tag your creation, and join our growing cooking community. Every version tells a little story, and yours might just inspire someone’s next dinner. Happy cooking and see you soon at recipes4us.org!

    Note: For more informations on nutrition, visit the website: nutrition.gov or MyPlate.gov | U.S. Department of Agriculture

  • Orange Chicken

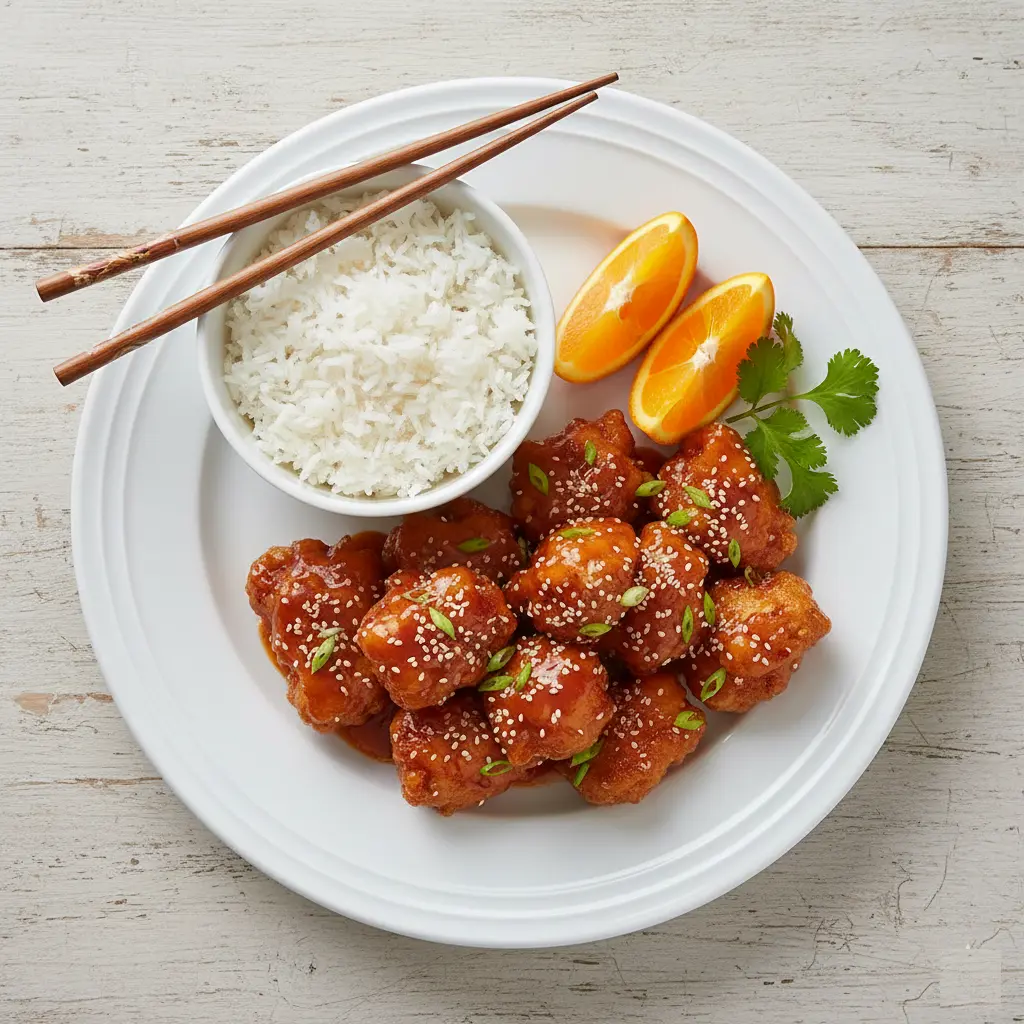
    Orange Chicken

    Introduction

    Orange chicken bursts with sweet, tangy, citrusy flavor and crisp edges. It evokes takeout nostalgia while being totally doable at home. Whether you’re craving a cozy weeknight dinner or want something to impress, this dish delivers. Let’s walk through what makes orange chicken so beloved, and how you can master it in your kitchen with confidence.

    Reasons You’ll Love Orange Chicken

    You’ll love this orange chicken recipe because it blends crisp, golden chicken with a sticky, flavorful orange glaze that dances on your tongue. It’s a win for texture and taste, crunchy and saucy. Plus, it’s customizable: want extra heat, go for red pepper flakes; want lighter, choose air-fried. It also comes together quickly, so you won’t be stuck in the kitchen all evening. And best of all, making it yourself means clean ingredients, no mystery additives, and a great reason to show off to family or friends.

    What Makes a Good Orange Chicken

    A standout orange chicken must balance sweetness, acidity, and a touch of heat. The sauce should cling to the chicken, not slide off. The chicken itself should remain crispy (or at least firm) under the sauce rather than soggy. You need real citrus tone, zest or fresh orange juice, not just sugar. A good version also layers aromatics like garlic and ginger so the flavor isn’t flat.

    Cultural Significance of Orange Chicken

    Orange chicken sits squarely in Chinese-American cuisine. It doesn’t trace directly to traditional Chinese recipes so much as it represents how immigrant communities adapted flavors for American palates. Over time, it became a staple in takeout menus across the U.S. While not “authentic” in the classical sense, it speaks to hybrid identities and evolving food traditions in diaspora communities.

    History of Orange Chicken

    Though its roots may reflect older Chinese citrus-peel dishes, the modern orange chicken we know was popularized in the late 1980s. Panda Express, a Chinese-American fast casual chain, credits chef Andy Kao, who introduced a version in Hawaii in 1987 using battered, boneless chicken and a sweet orange glaze.
    Traditional Chinese “tangerine chicken” or 陈皮鸡 (dry citrus peel chicken) may have influenced the idea, but that earlier dish is quite different in preparation and flavor profile. Wikipedia
    Over the decades, orange chicken became one of the signature dishes of Chinese-American dining, emblematic of adaptation, fusion, and mass appeal.

    Ingredients

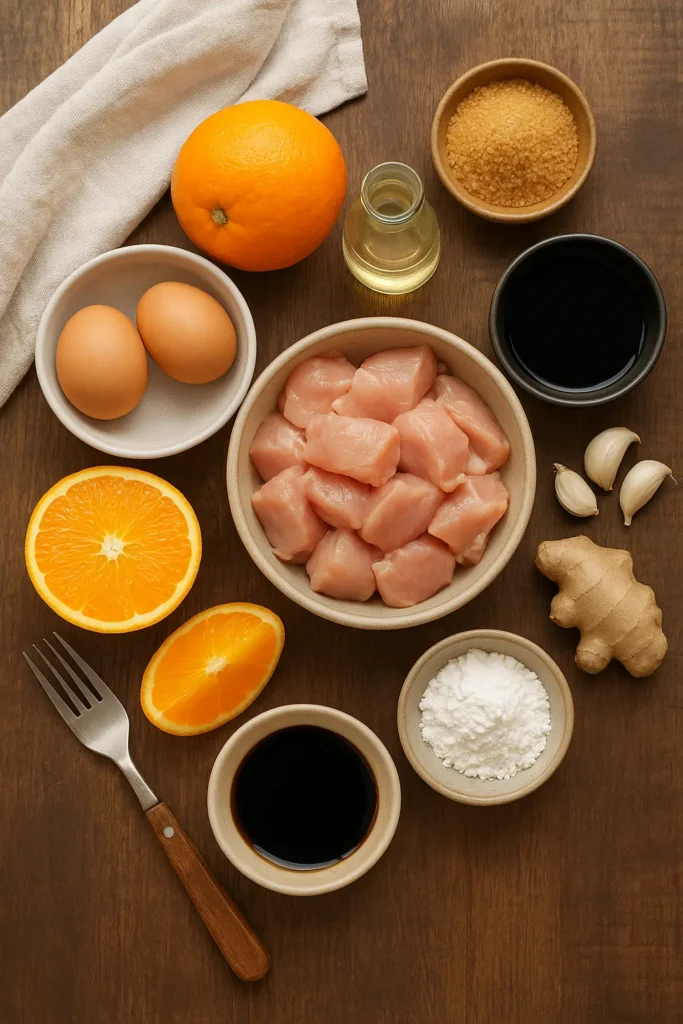
    orange chicken ingredients image

    Here’s a solid ingredient list to make orange chicken at home. You can adjust based on preferences:

    Chicken & Coating

    • 1.5 lb boneless, skinless chicken thighs or breasts, cut into bite-size pieces
    • 2 large eggs, whisked
    • ½ cup cornstarch (or mixture of cornstarch + flour)
    • Salt & pepper to season
    • Oil for frying (vegetable, peanut, or neutral oil)

    Orange Sauce

    • ž to 1 cup fresh orange juice (or more for brightness)
    • Zest of one orange (or dried citrus peel in traditional versions)
    • 2–3 Tbsp rice vinegar (or white vinegar)
    • 3 Tbsp brown sugar (or mixture of sugar + sweetener)
    • 2 Tbsp soy sauce
    • 1 Tbsp fresh grated ginger
    • 2 garlic cloves, minced
    • Pinch red chili flakes (optional for heat)
    • Cornstarch slurry (1 Tbsp cornstarch + water) to thicken sauce

    Garnish (optional but recommended)

    • Sliced green onions / scallions
    • Extra orange zest
    • Sesame seeds (optional)

    Instructions

    Here’s the step-by-step method to make orange chicken. Prep ahead, work efficiently, and you’ll get great results.

    1. Prep everything first: cut chicken into bite-size cubes, zest the orange, juice it, mince garlic and ginger, and whisk eggs. Mix your sauce ingredients in one bowl (juice, sugar, vinegar, soy, zest, ginger, garlic, chili flakes) so it’s ready.
    2. Season the chicken pieces with a little salt and pepper.
    3. In a bowl, coat chicken with cornstarch (or cornstarch + flour). It should cling to the surface. For extra crispness, you can double dredge (egg → starch → egg → starch).
    4. Heat oil in a wok or deep skillet over medium-high heat. The oil should reach about 350 °F (175 °C) for frying.
    5. Fry chicken in batches so you don’t overcrowd. Fry until golden and crisp, about 2–3 minutes per batch. Remove and let drain on paper towels.
    6. In a separate saucepan or same skillet (wipe clean), place the sauce mixture and bring it to a simmer over medium heat. Give it a minute or two to meld flavors.
    7. Prepare a cornstarch slurry (mix cornstarch + water) and whisk it into the simmering sauce. Let it thicken, stirring constantly, until it reaches a glossy consistency.
    8. Toss the fried chicken pieces in the sauce until each piece is coated.
    9. Garnish with green onions, extra orange zest, sesame seeds if using.
    10. Serve immediately over steamed rice, fried rice, or noodles.

    Orange Chicken Recipe

    Recipe by Cindy
    0.0 from 0 votes
    Cuisine: Chinese-AmericanDifficulty: Medium
    Servings

    4

    servings
    Prep time

    20

    minutes
    Cooking time

    25

    minutes
    Calories

    380

    kcal

    Ingredients

    • For the Chicken:
    • 1.5 lb boneless, skinless chicken thighs or breasts, cut into bite-size pieces

    • 2 large eggs, whisked

    • 1/2 cup cornstarch (or mix with flour for extra crunch)

    • Salt and black pepper to taste

    • Vegetable or peanut oil for frying

    • For the Orange Sauce:
    • 3/4 cup fresh orange juice

    • Zest of one orange

    • 3 tbsp brown sugar

    • 2 tbsp soy sauce

    • 2 tbsp rice vinegar

    • 1 tbsp grated fresh ginger

    • 2 cloves garlic, minced

    • 1/4 tsp red chili flakes (optional)

    • 1 tbsp cornstarch mixed with 2 tbsp water (slurry)

    • For Garnish:
    • Sliced green onions

    • Orange zest

    • Sesame seeds (optional)

    Directions

    • Instructions:
    • Cut chicken into bite-sized cubes and season with salt and pepper.
    • Coat pieces in cornstarch, dip in egg, and re-coat with starch if desired for extra crispiness.
    • Heat oil to 350°F (175°C) and fry chicken in small batches until golden and crisp, 2–3 minutes per batch. Drain on paper towels.
    • In a separate skillet, whisk together orange juice, zest, soy sauce, sugar, vinegar, garlic, ginger, and chili flakes. Bring to a simmer.
    • Stir in the cornstarch slurry and simmer until the sauce thickens and becomes glossy.
    • Toss the fried chicken in the sauce until evenly coated.
    • Garnish with scallions, sesame seeds, and extra orange zest. Serve hot over rice or noodles.
    • Equipment:
      Wok or deep skillet
      Mixing bowls
      Tongs
      Saucepan

    Notes

    • -Air fry or bake for a lighter version.
      -Sauce can be prepared a day ahead.
      -To keep chicken crisp, toss in sauce only before serving.

    How to Tell When Orange Chicken Is Done

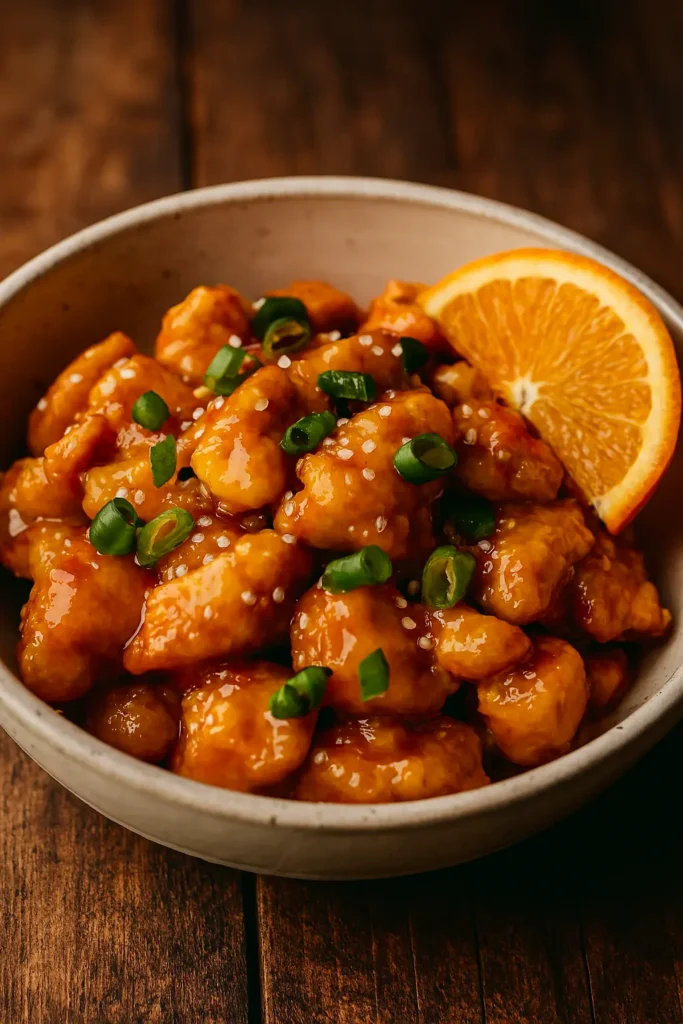
    You’ll know your orange chicken is done when the pieces are crisp on the outside, golden in color, and firm to the touch. The internal temperature should hit 165°F (74°C). When tossed in sauce, they should stay coated but not soggy. The sauce should be glossy and slightly sticky, not watery. If it runs thinly off a spoon, simmer a bit longer. For a home test, slice one piece, the inside should be white and juicy, never pink or rubbery.

    Variations and Toppings for Orange Chicken

    Orange chicken invites endless creativity. Here are a few delicious ways to change it up:

    Healthier Versions

    • Air Fryer: Lightly coat chicken in cornstarch, spray with oil, and air fry at 390°F for 12–15 minutes, shaking halfway through.
    • Baked: Bake coated chicken at 400°F for 20 minutes, flipping once. Then toss in warm orange glaze.

    Sauce Twists

    • Spicy Orange Chicken: Add extra red pepper flakes or a spoonful of chili paste for a fiery kick.
    • Honey Orange Chicken: Swap half the sugar for honey for a floral sweetness.
    • Orange Teriyaki: Mix in a little mirin or extra soy sauce for deeper umami.

    Toppings & Garnishes

    • Toasted sesame seeds
    • Chopped scallions
    • Crushed peanuts
    • Fresh orange zest or wedges for brightness

    Each variation tweaks the character of the dish, letting you tailor the flavor to your mood or guests.

    Nutritional Insights

    While orange chicken isn’t diet food, it can fit into a balanced lifestyle. One serving (about 1 cup) typically delivers around 350–400 calories, depending on frying method and sauce amount. Most of the calories come from the chicken and the glaze’s sugar. Using less oil, baking, or air frying significantly reduces fat. Swapping in low-sodium soy sauce and cutting the sugar makes it lighter. The orange juice provides vitamin C, while ginger and garlic bring anti-inflammatory benefits. Moderation is key, but so is enjoyment, savor every bite!

    Pro Tips and Tricks for Perfect Orange Chicken

    • Double Fry for Crispness: For restaurant-level crunch, fry chicken twice. First at 325°F for cooking through, then again at 375°F for that golden crisp texture.
    • Zest First: Always zest your orange before juicing, it’s easier and you won’t waste that aromatic peel.
    • Use Fresh Juice: Bottled orange juice can taste flat. Fresh juice brightens the sauce.
    • Cornstarch Slurry Timing: Add it only once the sauce simmers; too early and it won’t thicken right.
    • Keep Sauce and Chicken Separate Until Serving: If you want the crunch to last, coat only what you’ll eat immediately.
    • Control the Sweetness: Adjust sugar to your liking, some prefer tangy, others candy-sweet.
    • Garnish Wisely: A sprinkle of sesame seeds and scallions adds visual pop and texture.

    Following these small adjustments transforms your home-cooked orange chicken into something that rivals takeout, maybe even beats it.

    My Takes on Orange Chicken

    When I make orange chicken, I lean toward tangy rather than sugary. I use fresh-squeezed orange juice, extra zest, and a bit more vinegar to sharpen the flavor. Sometimes, I add a pinch of smoked paprika for warmth or toss in blistered broccoli florets for color. The beauty of this dish is its flexibility. It’s as comforting on a rainy weeknight as it is crowd-pleasing at a weekend get-together.

    Perfect Orange Chicken

    Storage and Health Tips

    If you have leftovers, cool them completely before storing. Place them in an airtight container and refrigerate for up to 3 days. The sauce will thicken slightly, but that’s easy to fix, reheat with a splash of water in a skillet over medium heat. Avoid microwaving if you want to keep the texture crisp.

    To freeze, store cooked chicken and sauce separately in freezer-safe bags. Thaw overnight in the fridge, then warm gently on the stove.

    For a lighter version, air-fry or bake your chicken instead of deep-frying. Use low-sodium soy sauce, and replace half the sugar with honey or fresh orange segments. Small tweaks make a big difference without sacrificing that signature flavor.

    Frequently Asked Questions

    Can I make orange chicken without deep frying?
    Absolutely! Air frying or baking gives great results with less oil. It won’t be quite as crisp, but it’s still delicious.

    Why does my sauce taste bitter?
    You might’ve added too much zest or used the white pith from the orange. Stick to the outer, fragrant peel only.

    What kind of orange juice works best?
    Fresh-squeezed orange juice offers the brightest flavor. Store-bought can work, but choose one without added sugar or pulp.

    Can I use chicken breast instead of thighs?
    Yes, though thighs stay juicier. If using breasts, don’t overcook, remove once they reach 165°F.

    How do I make it spicier?
    Add chili flakes, sriracha, or a bit of sambal oelek to the sauce for heat.

    Can I prepare it ahead of time?
    You can make the sauce a day in advance and refrigerate it. Reheat gently before tossing with fresh-fried chicken.

    What do I serve with orange chicken?
    It pairs beautifully with steamed jasmine rice, fried rice, lo mein, or stir-fried vegetables like broccoli and snow peas.

    How long does it keep?
    Stored properly, it stays good up to 3 days in the fridge or 2 months in the freezer.

    Before You Go

    Now that you’ve mastered this homemade orange chicken, why not try similar recipes like Honey Garlic Shrimp, Sweet and Sour Chicken, or General Tso’s Chicken next? Each dish brings its own twist on that irresistible sweet-and-savory magic.

    If you make this recipe, share your photos or thoughts, I love seeing your creations! Follow me on Pinterest for more easy Asian-inspired meals and comfort food favorites. Together, we’ll keep cooking fun, fresh, and full of flavor.

    Note: For more informations on nutrition, visit the website: nutrition.gov or MyPlate.gov | U.S. Department of Agriculture

  • Pumpkin Pie Recipe

    Pumpkin Pie Recipe

    Introduction

    Pumpkin pie recipe is the heart and soul of fall baking. This creamy, spiced dessert brings comfort to every table with its rich filling and buttery crust. Whether it’s Thanksgiving, Christmas, or a cozy weekend treat, pumpkin pie never fails to steal the spotlight. The combination of silky pumpkin puree, warm spices, and sweetened condensed milk or cream creates a balance that’s simply irresistible. There’s something magical about the smell of pumpkin pie baking, it feels like a hug in dessert form. And the best part? You don’t need to be a pro baker to master this pie. Once you try this version, you’ll never reach for a store-bought pie again.

    Reasons You’ll Love This Pumpkin Pie Recipe

    There are plenty of reasons this pumpkin pie deserves a spot in your baking lineup. For starters, it’s foolproof, seriously! The filling comes together in one bowl, and you don’t even need a mixer. Just whisk, pour, and bake. The crust can be homemade or store-bought, so it fits your comfort level and schedule. The texture? Creamy, custard-like, and smooth as silk.

    Another reason to love it is how adaptable it is. You can tweak the spices to match your preferences, add more cinnamon for warmth, a pinch of cardamom for a twist, or extra nutmeg if you love bold flavors. It’s the ultimate make-ahead dessert too. Pumpkin pie tastes even better after chilling overnight, allowing all the flavors to meld beautifully.

    Plus, it’s crowd-pleasing and photogenic, perfect for holiday tables or cozy gatherings. With whipped cream swirls or a dollop of crème fraîche, it looks and tastes like a bakery masterpiece, minus the price tag. Once you serve it, you’ll be asked for the recipe every single time.

    What Makes a Good Pumpkin Pie Recipe

    A truly good pumpkin pie strikes the perfect balance between texture and taste. The filling should be smooth and creamy, not grainy or runny. It needs just the right amount of spice, enough to bring out the pumpkin flavor but not overpower it. Using pure pumpkin puree (not pumpkin pie filling) is key; this lets you control sweetness and spice levels.

    The crust also plays a big role. It should be buttery, flaky, and crisp enough to hold up against the moist filling without becoming soggy. Blind-baking the crust for a few minutes before adding the filling helps achieve that golden, crisp bottom.

    And don’t forget about the bake time. Overbaking can lead to cracks on top, while underbaking makes it too soft. The trick? Bake until the center jiggles slightly like Jell-O. That means it’ll finish setting as it cools. Follow these details, and you’ll end up with the perfect pumpkin pie every time.

    Cultural Significance of Pumpkin Pie

    Pumpkin pie is more than just dessert; it’s a symbol of tradition and gratitude. In the United States and Canada, it’s the crown jewel of Thanksgiving and fall celebrations. Its presence on the table represents harvest, abundance, and family unity. The use of pumpkin, a native North American squash, connects the dish to the land’s agricultural roots and the first Thanksgiving meals shared between Indigenous peoples and early settlers.

    Over time, pumpkin pie became a marker of the season, as soon as the air turns crisp, people start craving its familiar warmth. It’s featured in countless holiday memories, from Grandma’s kitchen to modern Friendsgiving feasts.

    Beyond North America, the idea of sweet spiced squash or custard pies has spread globally, with bakers worldwide adding their local twist. In every version, pumpkin pie remains a comforting reminder of togetherness and tradition, baked into every bite.

    History of Pumpkin Pie

    Pumpkin pie’s story stretches back centuries. Native Americans were among the first to cook pumpkins by roasting or baking them with honey and spices, creating something close to the modern filling. When European settlers arrived, they adopted these methods and added their own techniques, like baking the mixture inside a crust.

    The earliest printed pumpkin pie recipes appeared in 17th-century English cookbooks. However, the version we know today, spiced pumpkin custard baked in a flaky pie shell, didn’t become popular until the 1800s. By then, canned pumpkin and pre-mixed spices made it easier for home cooks to prepare.

    During the 19th century, pumpkin pie cemented its role in Thanksgiving traditions, thanks to early American writers who mentioned it as a holiday staple. Since then, it’s evolved with modern baking trends, but the essence remains the same: a humble, comforting dessert that brings people together year after year.

    homemade pumpkin pie ingredients

    Pumpkin Pie

    Recipe by Cindy
    0.0 from 0 votes
    Course: DessertCuisine: AmericanDifficulty: Moderate
    Servings

    8

    servings
    Prep time

    20

    minutes
    Cooking time

    55

    minutes
    Calories

    320

    kcal

    Perfect Pumkin Pie Ingredients

    Ingredients

    • 1 unbaked 9-inch pie crust (homemade or store-bought)

    • 2 cups pumpkin puree (not pumpkin pie filling)

    • 3 large eggs

    • 1 cup light brown sugar, packed

    • 1 cup heavy cream or evaporated milk

    • 1 teaspoon ground cinnamon

    • 1/2 teaspoon ground ginger

    • 1/4 teaspoon ground cloves

    • 1/4 teaspoon ground nutmeg

    • 1/2 teaspoon salt

    • 1 teaspoon pure vanilla extract

    Directions

    • Preheat your oven to 425°F (220°C). Place a rack in the lower third of the oven.
    • Roll out your pie crust and gently fit it into a 9-inch pie dish. Trim any excess and crimp the edges.
    • To keep the crust crisp, line it with parchment paper, fill it with pie weights or beans, and blind-bake for 10 minutes. Remove weights and bake 5 minutes more until lightly golden. Set aside.
    • In a large bowl, whisk together pumpkin puree, brown sugar, spices, and salt until smooth.
    • Add eggs one at a time, whisking well after each addition. Pour in the cream and vanilla, stirring until fully combined and silky.
    • Pour the filling into the warm crust.
    • Bake at 425°F for 15 minutes, then reduce the oven temperature to 350°F (175°C). Continue baking for 40–45 minutes, or until the edges are set but the center jiggles slightly when moved.
    • Remove from the oven and let the pie cool on a wire rack for at least two hours.
    • Chill in the refrigerator for at least 3–4 hours before slicing. Serve cold or at room temperature with whipped cream.

    How to Tell When Pumpkin Pie Is Done

    Knowing when pumpkin pie is perfectly baked can be tricky, but there’s a foolproof way to tell. The edges should be set and slightly puffed, while the center should jiggle just a bit when you nudge the pan. Think of the wobble in a well-set cheesecake, that’s what you’re aiming for. If the whole pie moves like liquid, it’s not done yet.

    Avoid the temptation to overbake, as that often leads to cracks on the surface or a dry texture. The pie will continue cooking as it cools, so it’s better to remove it when slightly underdone. If you’re unsure, insert a knife about an inch from the crust; if it comes out mostly clean, you’re good to go. Allow it to cool completely before slicing. The result will be a silky-smooth, custard-like pumpkin filling that melts in your mouth.

    A slice of Homemade pumpkin pie

    Variations & Toppings for Pumpkin Pie Recipe

    One of the best things about pumpkin pie is how easily it adapts to your taste and creativity. You can stick to the classic version or give it a little twist each time you bake it. Here are some fun ideas:

    Flavor Variations:

    • Add a splash of bourbon or dark rum for a grown-up depth of flavor.
    • Stir in a few tablespoons of maple syrup or molasses for a richer sweetness.
    • Swap the traditional spices for pumpkin pie spice blend to save time.
    • Use coconut milk instead of cream for a dairy-free version.
    • For a lighter twist, try Greek yogurt for part of the cream, it adds tang and protein.

    Toppings to Try:

    • Whipped cream is the classic choice, pile it high or swirl it fancy.
    • Add a sprinkle of cinnamon sugar, crushed pecans, or candied ginger.
    • Drizzle with caramel or chocolate sauce for a dessert that feels indulgent.
    • Serve with a scoop of vanilla ice cream for the ultimate comfort treat.

    Each topping transforms your pie into something fresh while keeping that nostalgic pumpkin flavor intact.

    Nutritional Insights

    Pumpkin pie isn’t just delicious, it has a few sneaky nutritional perks too. Pumpkin itself is loaded with vitamin A, fiber, and antioxidants that support healthy skin and vision. The spices, especially cinnamon and ginger, have anti-inflammatory benefits and can help regulate blood sugar levels.

    Of course, pumpkin pie is still a dessert, so moderation is key. A standard slice averages around 300–350 calories, depending on the crust and cream used. Using evaporated milk instead of heavy cream can lighten it up a bit without losing texture. For less sugar, try substituting half the brown sugar with maple syrup or coconut sugar.

    It’s comforting to know that this holiday favorite can offer a mix of indulgence and a touch of nourishment. So yes, you can absolutely enjoy your pumpkin pie, guilt-free and full of flavor!

    Pro Tips and Tricks for Perfect Pumpkin Pie recipe

    Even though pumpkin pie is straightforward, these expert tips can help take your results from good to unforgettable:

    1. Use room temperature ingredients. This ensures your filling blends smoothly and bakes evenly.
    2. Blind-bake the crust. It’s worth the extra step. You’ll avoid a soggy bottom and get that satisfying flake with every bite.
    3. Warm your filling slightly. Pouring warm (not hot) filling into a warm crust helps the pie set evenly without cracking.
    4. Don’t overmix. Too much whisking introduces air bubbles, which can lead to cracks during baking.
    5. Rotate halfway. Ovens can bake unevenly, so turning your pie halfway through ensures even browning.
    6. Cool gradually. Let the pie cool at room temperature before refrigerating. Sudden temperature changes can cause cracks or weeping.
    7. Add a pie shield. Cover the crust edges with foil if they brown too quickly.
    8. Make ahead. Pumpkin pie actually tastes better the next day. The flavors meld beautifully overnight, making it perfect for stress-free entertaining.
    9. Freeze smartly. You can freeze a fully baked pie for up to two months. Just wrap tightly and thaw overnight in the fridge.

    Follow these steps, and your pumpkin pie will always come out bakery-perfect, smooth, spiced, and picture-worthy.

    My Takes on Pumpkin Pie

    Everyone has their own version of the “perfect” pumpkin pie, and this one is mine. I prefer using brown sugar instead of granulated for a deeper, caramel-like sweetness. I also like adding a dash of black pepper, yes, pepper, to enhance the warmth of the spices. It’s subtle but makes a huge difference.

    Another trick I swear by? Brushing the crust with egg wash and a sprinkle of sugar before baking. It gives that golden sparkle and adds crunch. Sometimes I swap traditional crust for a graham cracker base for a different texture, especially when I want a no-fuss option.

    This pumpkin pie recipe is forgiving, flexible, and totally worth mastering. Once you get the basics down, you can make it your own, just how every good homemade pie should be.

    Storage & Health Tips

    Pumpkin pie is best enjoyed fresh, but it stores beautifully too. After baking, let it cool completely at room temperature for at least two hours. Once cool, cover it loosely with plastic wrap or foil and refrigerate. It’ll stay fresh for up to four days. For longer storage, freeze it for up to two months, just thaw overnight in the fridge before serving.

    Avoid leaving pumpkin pie out for more than two hours, as the custard filling can spoil quickly. If you plan to serve it the next day, refrigerate immediately after cooling.

    For a slightly healthier twist, consider reducing sugar by 20% or using coconut sugar for a more natural sweetness. Using evaporated milk instead of heavy cream can also cut down on calories without sacrificing that creamy texture.

    If you’re serving leftovers, reheat slices in the oven at 300°F (150°C) for 10–15 minutes, it’ll taste freshly baked again.

    FAQs About Pumpkin Pie

    1. Can I make pumpkin pie ahead of time?
    Yes! In fact, it tastes even better after a night in the fridge. The flavors deepen, and the texture firms up perfectly.

    2. Why did my pumpkin pie crack?
    It’s usually from overbaking or cooling too fast. Pull the pie out when the center still jiggles slightly and let it cool gradually.

    3. Can I use fresh pumpkin instead of canned?
    Absolutely. Roast your pumpkin, then puree and strain it to remove excess moisture. Fresh pumpkin adds a lighter flavor but requires a bit more work.

    4. What’s the best crust for pumpkin pie?
    A classic buttery crust is always a winner, but graham cracker or gingersnap crusts also pair beautifully with the filling’s spices.

    5. How do I prevent a soggy crust?
    Blind-bake it first and use an egg wash to seal it. That creates a barrier between the crust and the moist filling.

    6. Can I make it dairy-free?
    Yes, swap heavy cream for coconut milk and use plant-based butter or shortening in the crust. The flavor remains rich and creamy.

    7. How long can pumpkin pie sit out?
    No more than two hours. After that, refrigerate it to keep it safe and fresh.

    8. Can I freeze pumpkin pie?
    Definitely. Wrap tightly and freeze for up to two months. Thaw overnight in the fridge before serving.

    Before You Go

    If you’ve made it this far, you’re officially ready to bake the best pumpkin pie recipe of your life! Whether you’re preparing for Thanksgiving or just craving a cozy slice of fall comfort, this recipe will always deliver.

    If you try this recipe, share your results, I’d love to see how your pie turned out! Tag your photos and follow me on Pinterest for more classic dessert inspiration.

    And before you leave, check out some of my other fall favorites like Pumpkin Spice Cake, Honey Garlic Shrimp, and Apple Crumble. Each one’s been tested, loved, and guaranteed to impress. Happy baking, and may your kitchen always smell like cinnamon and pie crust.

    Note: For more informations on nutrition, visit the website: nutrition.gov or MyPlate.gov | U.S. Department of Agriculture

  • Honey Garlic Shrimp

    Honey Garlic Shrimp

    Introduction

    Honey Garlic Shrimp is one of those dishes that brings joy to the table every single time. Sweet, savory, sticky, and bursting with garlicky goodness, it’s the kind of recipe that makes you want to lick the pan clean. Whether it’s a quick weeknight dinner or a show-stopping dish for guests, this shrimp recipe delivers restaurant-level flavor in just minutes. With the perfect balance of honey’s caramel notes and garlic’s sharp kick, this meal wins over even the pickiest eaters. Plus, cleanup is a breeze, one skillet, one bowl, and dinner’s ready before you know it.

    Reasons You’ll Love This Honey Garlic Shrimp Recipe

    You’ll fall for this recipe the moment you taste it. First off, it’s lightning-fast. We’re talking fifteen minutes from fridge to fork, including prep time. That makes it perfect for those nights when you want something impressive but don’t have the energy for a full-blown cooking session. The sauce is the real star, honey gives it that golden sweetness, soy sauce adds a salty depth, and garlic brings the punch that ties it all together.

    You’ll also love how versatile it is. Serve your Honey Garlic Shrimp over rice, noodles, or even a bed of crispy lettuce for a lighter option. It’s equally at home as an appetizer or main course. Plus, it’s made with simple pantry staples, nothing fancy, nothing hard to find. The best part? The shrimp soak up every drop of that sticky glaze, leaving behind a glossy, mouthwatering finish that looks as good as it tastes.

    What Makes a Good Honey Garlic Shrimp

    A great Honey Garlic Shrimp recipe starts with quality shrimp. Look for fresh or properly thawed, deveined shrimp with their tails left on for extra flavor and presentation. The balance of the sauce is crucial, too much honey, and you lose the savory bite; too little, and it’s just garlic soy shrimp. The key is to hit that sweet-salty harmony where every bite feels satisfying and addictive.

    Cooking technique matters too. You want to sear the shrimp just until pink and slightly caramelized. Overcook them, and they’ll turn rubbery; undercook, and you’ll miss out on that beautiful char. The sauce should thicken just enough to cling to each shrimp, coating it in a shiny glaze without turning soupy. When you get that balance right , juicy shrimp, sticky sauce, a little char , you’ve got pure magic.

    Cultural Significance of Honey Garlic Shrimp

    Honey Garlic Shrimp might feel like a modern fusion dish, but its roots stretch across multiple food cultures. The combination of sweet and savory is a hallmark of Asian cuisine, particularly Chinese and Japanese cooking, where honey, soy, and garlic often mingle in sauces for meats and seafood. In many Western kitchens, especially in North America, this flavor combo became a weeknight hero, a simplified version of traditional stir-fries adapted for quick home cooking.

    Today, Honey Garlic Shrimp bridges cultures beautifully. You’ll see it in Asian-inspired bistros, Southern seafood joints, and on countless home dinner tables. It’s a dish that reflects global tastes, quick, balanced, and bold. It also shows how food evolves: what started as a regional flavor pairing became an international favorite. The simplicity of honey and garlic has universal appeal, they speak the same language of comfort, flavor, and satisfaction, no matter where you are.

    History of Honey Garlic Shrimp

    While no one can pinpoint the exact origin of Honey Garlic Shrimp, the sweet-and-savory combo has deep roots in Asian cuisine. Garlic has been used for thousands of years in Chinese cooking, while honey was prized as both food and medicine. When soy sauce became widespread in global trade, cooks started blending these three ingredients to create flavorful glazes for meats and seafood.

    By the 20th century, as Chinese restaurants gained popularity in the West, dishes like honey garlic chicken or pork made their way into menus, often coated in glossy sauces that appealed to both Eastern and Western palates. Shrimp entered the picture as seafood became more affordable and available. Today’s version, quick, skillet-cooked, and heavy on flavor, was popularized by food bloggers and home cooks who loved how effortlessly it came together. The result is a global comfort dish that feels homemade but tastes gourmet.

    Sticky Honey Garlic Shrimp ingredients

    Quick 20-Minute Honey Garlic Shrimp

    Recipe by Cindy
    0.0 from 0 votes
    Cuisine: Asian-American FusionDifficulty: Easy
    Servings

    4

    servings
    Prep time

    10

    minutes
    Cooking time

    10

    minutes
    KCalories/serving

    280

    kcal

    Fast. Flavorful. Foolproof.

    Ingredients

    • 1 pound (450g) large shrimp, peeled and deveined

    • 1/3 cup honey

    • 1/4 cup low-sodium soy sauce

    • 4 cloves garlic, minced

    • 1 tablespoon fresh ginger, grated (optional but recommended)

    • 2 tablespoons olive oil or butter

    • 1 teaspoon cornstarch (optional, for thickening)

    • A squeeze of fresh lemon or lime juice

    • Red pepper flakes (for a bit of heat)

    • Chopped scallions or sesame seeds for garnish

    Directions

    • Start by making the marinade. In a small bowl, whisk together honey, soy sauce, minced garlic, and ginger. Set aside about two tablespoons of this mixture to use later as a glaze.
    • Add your shrimp to a shallow bowl or zip-top bag and pour the remaining marinade over them. Let them soak for at least 10–15 minutes in the fridge.
    • Heat a large skillet or wok over medium-high heat. Add olive oil or butter and swirl to coat the pan.
    • Using tongs, remove the shrimp from the marinade (don’t pour the used marinade in yet) and cook them in batches. You’ll want to sear each side for about 1–2 minutes until they turn pink and slightly caramelized.
    • Once all the shrimp are cooked, pour the reserved two tablespoons of sauce into the pan. If you prefer a thicker glaze, mix the cornstarch with a teaspoon of water and add it to the sauce. Stir until it thickens slightly.
    • Return the shrimp to the pan, toss to coat, and cook for another 30 seconds. Finish with a squeeze of lemon or lime juice for brightness.
    • Serve immediately, garnished with scallions or sesame seeds.

    How to Tell When Honey Garlic Shrimp Is Done

    Shrimp cook fast, and timing is everything. The first clue is color, raw shrimp start out gray and translucent but turn pink and opaque when perfectly cooked. As soon as the tails curl slightly into a “C” shape, they’re ready. If they twist tightly into an “O,” they’re overcooked and will taste rubbery. Another indicator is texture: when pressed lightly, a cooked shrimp should feel firm but not tough.

    Keep an eye on them, especially when cooking in a hot skillet. It usually takes just 90 seconds per side. The sauce should start to bubble and thicken, coating the shrimp with a glossy glaze. Pull the pan off the heat immediately, residual heat will finish the cooking. Perfectly cooked Honey Garlic Shrimp should be tender, juicy, and shimmering with that sticky honey-garlic sauce.

    Honey Garlic Shrimp recipe

    Variations & Toppings for Honey Garlic Shrimp

    Honey Garlic Shrimp is endlessly flexible, and you can tweak it based on your mood or what’s in your pantry. Here are a few ways to switch it up:

    • Spicy Honey Garlic Shrimp: Add chili flakes, sriracha, or a drizzle of hot honey for an extra kick.
    • Citrus Twist: Mix orange juice or zest into the sauce for a tangy-sweet note.
    • Coconut Style: Use coconut oil for cooking and stir in a splash of coconut milk to make a creamy glaze.
    • Vegetable Boost: Toss in snap peas, bell peppers, or broccoli for color and crunch.
    • Honey Garlic Shrimp Skewers: Thread shrimp onto skewers and grill them for a smoky summer vibe.
    • Sticky Honey Garlic Noodles: Add cooked noodles directly into the skillet and toss them in the sauce for a comforting one-pan meal.

    Top your finished dish with sesame seeds, sliced scallions, or crushed peanuts for added texture. These toppings bring a restaurant-worthy flair right to your kitchen.

    Nutritional Insights for Honey Garlic Shrimp

    This dish strikes a great balance between indulgence and health. Shrimp are naturally low in calories and high in lean protein, providing essential nutrients like selenium, iodine, and vitamin B12. A 4-ounce serving delivers about 23 grams of protein with under 150 calories. Honey provides natural sweetness and a bit of quick energy, while garlic supports heart health and immunity.

    The only area to watch is sodium from soy sauce and sugar from honey, both are easy to adjust. Opt for low-sodium soy sauce and use a touch less honey if you’re counting carbs. Serve your Honey Garlic Shrimp with brown rice, quinoa, or steamed vegetables for a balanced meal that’s filling but light. You get a plate that’s high in flavor and satisfaction without the heavy guilt.

    Pro Tips and Tricks for the Best Honey Garlic Shrimp

    1. Use raw shrimp, not pre-cooked. Pre-cooked shrimp can turn rubbery fast. Raw shrimp soak up flavor and caramelize better.
    2. Dry your shrimp before cooking. Moisture prevents that golden sear. Pat them dry with paper towels before adding them to the pan.
    3. Don’t overcrowd the skillet. Cook in batches so each shrimp gets direct contact with heat. Crowding leads to steaming instead of searing.
    4. Marinate briefly. Shrimp don’t need long, 15 minutes is plenty. Longer marinating can make them mushy.
    5. Add the honey late. If the pan’s too hot, honey can burn quickly. Add it toward the end to preserve its sweetness and shine.
    6. Finish with acid. A quick squeeze of lemon or lime cuts through the sweetness and brightens the flavor beautifully.
    7. Taste the sauce. Before tossing the shrimp back in, adjust saltiness or sweetness to your liking, every honey and soy brand tastes a bit different.
    8. Serve immediately. Shrimp continue to cook even after removing from heat, so serve right away for perfect tenderness.

    These simple habits turn a good shrimp dish into a great one, flavorful, juicy, and perfectly glazed.

    My Take on this recipe

    My favorite part of Honey Garlic Shrimp is how rewarding it is for the effort involved. It’s the kind of meal that makes you feel like you’ve mastered restaurant-style cooking, but without needing any special tools or tricks. I like to add a hint of crushed red pepper for balance and serve it over jasmine rice with roasted broccoli. The leftovers (if there are any!) are even better the next day when the flavors meld together.

    It’s also one of the few dishes everyone in my house agrees on, sweet enough for the kids, garlicky enough for me, and ready in minutes. That’s a win in any home cook’s book.

    Storage & Health Tips

    If you have leftovers, store them properly to keep that honey-garlic magic intact. Let the shrimp cool to room temperature before transferring to an airtight container. Refrigerate for up to 3 days. To reheat, use a skillet over low heat and add a splash of water or broth to loosen the sauce, microwaving tends to make shrimp tough.

    You can also freeze Honey Garlic Shrimp, though the sauce might slightly separate upon thawing. For best results, freeze the cooked shrimp separately and make a fresh batch of sauce when reheating.

    Health-wise, this dish fits nicely into balanced diets. It’s rich in lean protein, contains healthy fats when cooked with olive oil, and avoids heavy creams or breading. If you’re reducing sodium, go for low-sodium soy sauce. Watching sugar? Use less honey or swap part of it with a zero-calorie natural sweetener. Small tweaks, big benefits, and no loss of flavor.

    FAQs About Honey Garlic Shrimp

    1. Can I use frozen shrimp?
    Absolutely. Just make sure to thaw and pat them dry first. Wet shrimp won’t sear properly and can dilute the sauce.

    2. Is this dish gluten-free?
    Yes, if you use tamari or coconut aminos instead of soy sauce. Those swaps keep the flavor while making it celiac-friendly.

    3. Can I bake or air fry instead of pan-cooking?
    Definitely. For baking, place shrimp on a lined tray at 400°F (200°C) for 8–10 minutes, brushing them with the sauce halfway. For air frying, cook at 375°F (190°C) for 6–8 minutes.

    4. What sides go best with Honey Garlic Shrimp?
    Try jasmine rice, garlic noodles, stir-fried veggies, or even cauliflower rice for a lighter twist. A crisp cucumber salad also balances the sweetness.

    5. Can I make the sauce ahead?
    Yes, it keeps well in the fridge for up to 5 days. Just give it a quick stir before using, as honey can settle.

    6. Why is my sauce too runny or thick?
    If it’s thin, cook it a bit longer or add a cornstarch slurry. If it’s too thick, stir in a tablespoon of water or broth until smooth.

    7. Can I use another protein?
    You can! Chicken, salmon, or tofu all pair beautifully with the honey-garlic glaze. Adjust cooking times accordingly.

    8. How do I keep shrimp tender?
    Don’t overcook them, 90 seconds per side is all they need. Remove them from heat as soon as they turn opaque and pink.

    Before You Go

    Honey Garlic Shrimp is one of those recipes that deserves a permanent spot in your weekly rotation, quick, flavorful, and always satisfying. If you enjoyed this one, check out more shrimp and seafood recipes on the blog for endless mealtime inspiration.

    I’d love to see your version, tag your photos or share them online so we can celebrate your cooking wins together! Don’t forget to follow on Pinterest for fresh recipe ideas, tips, and mouthwatering visuals that’ll keep your kitchen buzzing.

    Cooking should be fun, flavorful, and shared, so grab your skillet, a bottle of honey, and let’s make magic happen again soon.

    Note: For more informations on nutrition, visit the website: nutrition.gov

  • Pumpkin Spice Texas Sheet Cake

    Pumpkin Spice Texas Sheet Cake

    Introduction & Overview

    What Is a Pumpkin Spice Texas Sheet Cake?

    A Pumpkin Spice Texas Sheet Cake takes the famous chocolate sheet cake from the South and gives it a fall makeover. Instead of cocoa, pumpkin puree and aromatic spices like cinnamon, nutmeg, and ginger become the stars. The result? A thin, moist cake with bold autumn flavors and a topping that ranges from cream cheese frosting to nutty brown butter glaze.

    Unlike layered cakes, this version is quick, simple, and made in a single sheet pan. Slice it into squares and you’ve got a dessert that’s both fuss-free and irresistible.

    Why It’s a Must for Fall & Gatherings

    This cake’s popularity comes down to three things: flavor, convenience, and nostalgia. It captures the essence of fall, serves a crowd with ease, and works beautifully with different frostings. From Halloween parties to Thanksgiving tables, it’s the kind of dessert that always disappears fast. Even bakers like Joy the Baker have reimagined it with brown butter twists, proving its timeless charm.

    Roots of the Texas Sheet Cake

    The Texas sheet cake is a classic Southern dessert known for its thin layers, tender crumb, and glossy icing poured over the cake while still warm. Traditionally made with chocolate, it was prized for being easy, affordable, and perfect for potlucks or church suppers.

    Evolution into Pumpkin Spice Variations

    As fall flavors grew more popular, bakers began experimenting with pumpkin puree and spices. The moist texture of pumpkin worked seamlessly in sheet cakes, and when paired with cinnamon, nutmeg, and cloves, it created a new seasonal favorite. Recipes soon popped up on blogs, with versions featuring cream cheese frosting, brown butter icing, and even chocolate swirls. Today, when people think “fall sheet cake,” chances are they mean Pumpkin Spice Texas Sheet Cake.

    Easy Pumpkin Spice Texas Sheet Cake

    Recipe by Cindy
    0.0 from 0 votes
    Course: DessertCuisine: AmericanDifficulty: Easy
    Servings

    16

    slices
    Prep time

    20

    minutes
    Cooking time

    25

    minutes
    Calories

    320

    kcal

    Ingredients & Step-by-Step Recipe

    Ingredients

    • For the Cake:
    • 2 cups all-purpose flour

    • 2 cups granulated sugar

    • 1 teaspoon baking soda

    • 1 teaspoon baking powder

    • 1/2 teaspoon salt

    • 2 teaspoons ground cinnamon

    • 1 teaspoon ground nutmeg

    • 1/2 teaspoon ground cloves

    • 1/2 teaspoon ground ginger

    • 1 cup unsalted butter (2 sticks), melted

    • 1 can (15 oz) pumpkin puree (not pumpkin pie filling)

    • 1/2 cup buttermilk

    • 3 large eggs

    • 2 teaspoons vanilla extract

    • For the Frosting:
    • 8 oz cream cheese, softened

    • 1/2 cup unsalted butter, softened

    • 4 cups powdered sugar

    • 2 teaspoons vanilla extract

    • 1–2 tablespoons milk (if needed for consistency)

    • Optional toppings: chopped pecans, candied ginger, or cinnamon dust

    Directions

    • Preheat & Prep – Preheat your oven to 350°F (175°C). Grease and flour a 10×15-inch sheet pan or line with parchment.
    • Mix Dry Ingredients – In a large bowl, whisk together flour, sugar, baking soda, baking powder, salt, cinnamon, nutmeg, cloves, and ginger.
    • Combine Wet Ingredients – In another bowl, mix melted butter, pumpkin puree, buttermilk, eggs, and vanilla until smooth.
    • Make the Batter – Pour wet ingredients into dry ingredients. Stir gently until just combined—don’t overmix.
    • Bake the Cake – Spread batter evenly into the prepared pan. Bake for 25–30 minutes, or until a toothpick inserted comes out clean.
    • Cool Completely – Let the cake cool fully in the pan before frosting.
    • Prepare Frosting – Beat cream cheese and butter until creamy. Add powdered sugar and vanilla; mix until fluffy. If needed, add milk 1 tablespoon at a time.
    • Frost & Garnish – Spread frosting evenly over cooled cake. Top with chopped pecans, candied ginger, or a sprinkle of cinnamon if desired.
    • Serve & Enjoy – Slice into squares and enjoy with coffee, tea, or as a festive dessert centerpiece.

    Ingredient Breakdown & Variations

    Core Cake Ingredients

    The base is simple but effective: flour, sugar, eggs, pumpkin puree, oil or butter, and leavening agents. Add in the spice mix, cinnamon, nutmeg, ginger, cloves, and you’ve got a cake that smells like autumn as it bakes. Optional extras like pecans or chocolate chips add texture and richness.

    Frosting Options

    The frosting is what takes this cake from good to unforgettable:

    • Cream cheese frosting – tangy and classic.
    • Brown butter glaze – nutty, rich, and deeply flavorful (Joy the Baker makes a stellar version).
    • Spiced chocolate icing – a bold pairing for pumpkin.
    • Buttermilk glaze – lighter, with a tangy finish.

    Each choice brings a unique twist, making this cake endlessly adaptable.

    Creative Twists

    Variations keep the recipe fresh: marbling pumpkin with chocolate, topping with candied pecans, or dividing batter into smaller pans for mini sheet cakes. Gluten-free flours or vegan substitutions also work, making the dessert friendly for different diets.

    Pumpkin Spice Texas Sheet Cake ingredients

    Step-by-Step Recipe & Method

    Preparation

    Preheat the oven to 350°F (175°C). Grease a 13×18-inch sheet pan (or a 9×13 for thicker slices). Line with parchment for easy cutting. Bring eggs to room temp and ensure pumpkin puree is well-drained if homemade.

    Mixing the Batter

    Whisk flour, baking soda, baking powder, salt, and spices in one bowl. In another, beat sugar, eggs, and oil (or melted butter). Stir in pumpkin puree, then gently fold wet and dry together until just combined. The batter should be thick but pourable.

    Baking

    Spread evenly in the pan and bake for 25–30 minutes (35–40 in a 9×13). A toothpick should come out with a few moist crumbs—not completely clean—to keep the cake tender.

    Frosting

    For traditional icing, pour it on while the cake is warm so it soaks into the surface. For cream cheese frosting, wait until the cake cools completely. Use an offset spatula for smooth spreading, and finish with nuts, spices, or chocolate shavings if desired.

    Serving & Storage

    Cut into squares directly in the pan and serve at room temperature. Cover leftovers with foil or store in airtight containers. It stays fresh for three days on the counter, up to a week in the fridge, and two months in the freezer.

    Tips, Troubleshooting & Pro Secrets

    Even though Pumpkin Spice Texas Sheet Cake is a forgiving recipe, a few pro tips can help guarantee bakery-level results.

    Baking Tips for Success

    • Use canned pumpkin puree – It’s consistent in texture and moisture compared to homemade puree, which can vary.
    • Don’t overmix – Stir until just combined to avoid a dense cake.
    • Check early – Every oven is different, so start checking for doneness at 20 minutes.
    • Spread evenly – Use a spatula to smooth the batter for uniform baking.

    Common Mistakes to Avoid

    • Using pumpkin pie filling – This already has sugar and spices, which will throw off the recipe.
    • Skipping parchment – Makes cutting and serving messier.
    • Overbaking – The thin layer of cake dries out quickly if left too long.
    • Frosting too soon – Cream cheese frosting will melt if applied while the cake is warm.

    Pro Secrets for Flavor Boost

    • Toast the spices – Briefly warm cinnamon, nutmeg, and cloves in a dry pan to intensify aroma.
    • Brown the butter – For frostings, this adds a nutty depth that pairs beautifully with pumpkin.
    • Add espresso powder – Just a teaspoon deepens the spice and pumpkin flavors without tasting like coffee.
    • Top with flaky salt – Balances the sweetness and adds a gourmet touch.

    Storage & Make-Ahead Hacks

    Bake the cake a day in advance; in fact, it often tastes better the next day as the flavors settle. Store unfrosted cake tightly wrapped, then add frosting just before serving for the freshest presentation.

    Serving Ideas & Seasonal Appeal

    Moist Pumpkin Spice Texas Sheet Cake

    A Pumpkin Spice Texas Sheet Cake shines brightest during autumn gatherings, but it’s versatile enough for many occasions.

    • Holiday centerpiece – A crowd-pleaser for Thanksgiving or Friendsgiving.
    • Casual potlucks – Its sheet-pan size makes it easy to slice and share.
    • Coffee companion – A small square pairs beautifully with a latte or chai.
    • Festive dĂŠcor – Sprinkle crushed pecans, candied ginger, or even sugared cranberries for a seasonal look.

    Since the cake has that warm spice profile, it’s a perfect dessert for chilly days, when comfort food cravings are at their peak.

    Health & Nutrition Notes

    While this cake is indulgent, small tweaks can lighten it up without losing flavor.

    • Reduce sugar – Cut back slightly, since pumpkin adds natural sweetness.
    • Swap frosting – Use Greek yogurt glaze instead of cream cheese frosting.
    • Whole wheat flour – Replace part of the flour to add fiber.
    • Plant-based options – Almond milk and vegan cream cheese create a dairy-free version.

    That said, this dessert is meant for sharing, and a modest square can fit into most balanced diets.

    FAQs on Pumpkin Spice Texas Sheet Cake

    Can I make this cake ahead of time?
    Yes, you can bake it a day or two in advance. Store it covered at room temperature (unfrosted), then frost before serving.

    What’s the best substitute for cream cheese frosting?
    A cinnamon glaze, maple buttercream, or even a simple dusting of powdered sugar works beautifully.

    Can I freeze Pumpkin Spice Texas Sheet Cake?
    Absolutely! Wrap unfrosted squares tightly and freeze for up to three months. Defrost at room temperature and frost before serving.

    Conclusion & Final Thoughts

    A Pumpkin Spice Texas Sheet Cake isn’t just dessert, it’s a celebration of fall flavors baked into a no-fuss, crowd-sized treat. With its moist texture, spiced aroma, and creamy frosting, it delivers comfort and festivity in every bite. Whether you’re serving it at a holiday table or enjoying a square with morning coffee, this cake proves that simple recipes often bring the greatest joy.

    Before You Go

    I’d love to see your version, tag your photos or share them online so we can celebrate your cooking wins together! Don’t forget to follow on Pinterest for fresh recipe ideas, tips, and mouthwatering visuals that’ll keep your kitchen buzzing.

    Cooking should be fun, flavorful, and shared, so grab your skillet, a bottle of honey, and let’s make magic happen again soon.

    Note: For more informations on nutrition, visit the website: nutrition.gov

  • comfort food pork chops with caramelized apples

    comfort food pork chops with caramelized apples

    Comfort Food Pork Chops with Caramelized Apples

    Before diving into the step-by-step cooking method, let’s set the stage. This article is all about making comfort food pork chops with caramelized apples, a dish that blends tender, juicy pork with sweet, golden apples in a way that screams cozy, home-cooked perfection. You’ll find not just a recipe, but also cooking tips, side dish pairings, and variations that’ll help you master this classic. From choosing the right cut of pork to selecting the best apple variety, you’ll soon see why this meal deserves a regular spot at your table.

    Introduction: Comfort Food at Its Best

    There’s something magical about digging into a plate of pork chops with caramelized apples. The sizzle of the pan, the aroma of butter and spices, and the way savory meat meets the sweet tang of apples, it’s pure nostalgia in every bite. Comfort food isn’t just about filling your belly; it’s about wrapping yourself in a sense of warmth and familiarity. And this dish? It does that in spades.

    While plenty of meals claim to be comforting, few strike that sweet-savory balance quite like this one. Pork brings the richness, apples bring brightness, and together they create a dish that feels hearty yet surprisingly refined.

    comfort food pork chops with caramelized apples

    Recipe by Cindy
    0.0 from 0 votes
    Course: Dinner, MainCuisine: American, Comfort Food
    Servings

    4

    servings
    Prep time

    15

    minutes
    Cooking time

    20

    minutes
    Calories

    480

    kcal

    Preparation & Cooking

    Ingredients

    • For the Pork Chops:
    • 4 pork chops (bone-in or boneless, about 1 inch thick)

    • 2 tbsp olive oil (or 1 tbsp oil + 1 tbsp butter combo)

    • 1 tsp salt

    • ½ tsp black pepper

    • ½ tsp garlic powder (optional)

    • ½ tsp dried sage or thyme (optional)

    • For the Caramelized Apples:
    • 2 large Granny Smith or Honeycrisp apples (peeled, cored, sliced)

    • 2 tbsp unsalted butter

    • 2 tbsp brown sugar (light or dark)

    • ½ tsp ground cinnamon

    • Pinch of nutmeg (optional)

    • Âź cup apple cider or chicken broth (for deglazing)

    • 1 small onion, thinly sliced (optional, for savory twist)

    • Optional Garnishes / Add-Ons:
    • 2 tbsp chopped pecans or walnuts (toasted)

    • Fresh thyme or sage leaves

    Directions

    • Prep the Pork Chops
    • Remove pork chops from the fridge 20–30 minutes before cooking.
    • Pat dry with paper towels.
    • Season both sides with salt, pepper, and optional garlic powder or sage.
    • Sear the Pork Chops
    • Heat a heavy skillet (cast iron preferred) over medium-high heat.
    • Add oil (or butter + oil mix).
    • Place chops in the pan and sear for 4–5 minutes without moving.
    • Flip and cook for another 4–5 minutes until golden brown.
    • Check internal temperature with a meat thermometer; target is 145°F (63°C).
    • Remove chops, cover loosely with foil, and let rest.
    • Caramelize the Apples
    • In the same skillet, melt butter over medium heat.
    • Add sliced apples (and onion, if using).
    • Sprinkle with brown sugar, cinnamon, and nutmeg.
    • Cook, stirring occasionally, until apples soften and turn golden (about 5–7 minutes).
    • Deglaze with apple cider or broth, scraping up brown bits.
    • Combine and Finish
    • Return pork chops to skillet, nestling them into the apples.
    • Spoon sauce and apples over the chops.
    • Simmer gently for 2–3 minutes so flavors meld.
    • Serve
    • Garnish with fresh herbs and toasted nuts if desired.
    • Serve hot with mashed potatoes, roasted vegetables, or green beans.

    The Appeal of Pork and Apples: Sweet Meets Savory

    Ever heard the saying “pork chops and applesauce”? That old phrase is more than just a sitcom punchline, it reflects a pairing that cooks have celebrated for centuries. Apples cut through the richness of pork with their acidity and gentle sweetness, while the meat grounds the fruit with savory depth. It’s like the culinary version of yin and yang.

    But why does it work so well? Pork is mild yet flavorful, which makes it an ideal partner for fruits that caramelize beautifully. Granny Smith, Honeycrisp, and even Gala apples bring a crisp bite that stands up to the meat’s juicy tenderness. Add a little butter, some brown sugar, and maybe a sprinkle of cinnamon or sage, and suddenly you’ve got a one-pan wonder that’s both simple and soul-satisfying.

    If you’ve ever tried something like Caramel Apple Pork Chops, you’ll know exactly what we mean. The blend of fruit and meat feels timeless, perfect for chilly evenings, family dinners, or whenever you crave something that feels like a warm hug on a plate.

    Overview of the Method and What You’ll Learn

    Now, before we get lost in the aroma of sizzling butter, here’s what this article will walk you through:

    • How to choose the best pork chops (bone-in vs boneless, thick vs thin).
    • Which apple varieties caramelize best without turning into mush.
    • Step-by-step guidance on searing, caramelizing, and combining for maximum flavor.
    • Expert tips to avoid overcooking pork and ruining apples.
    • Storage tricks, reheating advice, and tasty variations that keep things exciting.

    By the time you’re done reading, you won’t just have a recipe, you’ll have a whole toolbox for creating the ultimate comfort food pork chops with caramelized apples. Whether you’re cooking for a weeknight dinner or hosting friends, you’ll be able to serve up a dish that makes everyone’s taste buds sing.

    Ingredient Deep Dive🥩

    Choosing the Right Pork Chops

    When it comes to making comfort food pork chops with caramelized apples, the cut of meat you choose makes or breaks the dish. Bone-in pork chops often pack more flavor and stay juicier during cooking, thanks to the bone acting as a natural insulator. On the other hand, boneless pork chops are quicker to cook and easier to slice, making them a weeknight-friendly option.

    Thickness also matters, a chop that’s about an inch thick gives you the perfect balance between tenderness and flavor without risking dryness. If your butcher offers marbled cuts, grab them. That extra fat renders down beautifully, keeping each bite juicy and flavorful.

    Some cooks like to brine their chops in a simple mix of water, salt, and a touch of sugar. This quick step helps the meat stay moist and gives it a gentle seasoning throughout.

    the ingredients  of  the comfort food pork chops with caramelized apples

    Picking Apples and Other Flavoring Ingredients

    Not all apples are created equal, especially when they’re destined for the heat of a skillet. Granny Smith apples are tart and firm, making them a favorite for balancing the richness of pork. Honeycrisp and Braeburn bring a sweeter profile without collapsing into mush, while Gala offers a mellow flavor that caramelizes beautifully.

    Beyond apples, you’ll want a few supporting players:

    • Butter: the backbone of caramelization.
    • Brown sugar: adds depth and warmth.
    • Cinnamon and nutmeg: cozy spices that whisper “comfort food.”
    • Fresh herbs like sage or thyme: balance sweetness with earthy notes.
    • Apple cider or broth: for deglazing and layering flavor.
    • Optional add-ons: onions for savory contrast, pecans or walnuts for crunch, and a splash of cream if you’re leaning toward indulgence.

    Together, these ingredients transform simple chops into something memorable, just like the skillet-based magic you’ll find in apple and onion pork chops

    Required Equipment & Tools

    To make this dish seamlessly, gather these essentials before you begin:

    • A heavy cast iron skillet or stainless steel pan for even browning.
    • A meat thermometer to avoid overcooking.
    • Tongs for flipping chops without piercing them.
    • A sharp knife and sturdy cutting board for prepping apples.
    • Mixing bowls for seasoning blends.

    Having the right tools ensures that each step, from searing to caramelizing, happens smoothly.

    🧑‍🍳Step-by-Step Cooking Process

    Prepping the Pork Chops

    Start by bringing your pork chops to room temperature for even cooking. Pat them dry with paper towels, then season generously with salt, black pepper, and, if you’d like, a sprinkle of ground sage or garlic powder. If you’ve brined them, skip extra salt.

    Searing the Pork Chops

    Heat your skillet until it’s hot enough that a drop of water sizzles immediately. Add a swirl of oil, or better yet, a butter-and-oil combo to prevent burning. Place the chops down and let them sear without moving, patience is key here. After about 4–5 minutes, flip and repeat. You’re aiming for a golden crust that locks in juices.

    Cook until the internal temperature reaches about 145°F (63°C), then remove the chops and let them rest under foil.

    Caramelizing the Apples (and Onions, Optional)

    Now it’s time for the stars of the show, the apples. Melt butter in the same skillet, scraping up the flavorful brown bits left from the pork. Toss in apple slices with a sprinkle of brown sugar, letting them soften and turn golden.

    If you’re feeling adventurous, add thinly sliced onions for a deeper, savory-sweet profile, similar to what you’d find in apple and onion pork chop recipes. A splash of apple cider or broth helps deglaze the pan and prevents burning.

    Combining Pork and Apples, Finishing

    Nestle the pork chops back into the skillet with the apples. Let everything mingle over low heat for a few minutes so the flavors marry. Spoon the caramelized apples over the chops, baste with the pan sauce, and prepare to wow your taste buds.

    Sauce, Glaze, and Finishing Touches

    If you love saucy dishes, let the juices reduce slightly until they thicken into a glossy glaze. A touch of fresh thyme or sage at the end elevates the aroma, while chopped nuts add a lovely crunch.

    sweet and savory pork chops with apples

    🧑‍🍳Tips, Pitfalls & Pro Techniques

    Even simple recipes can go sideways if you’re not careful, so here are a few tricks of the trade:

    • Don’t crowd the pan, cook chops in batches if needed.
    • Use firm apples; softer ones will collapse into applesauce.
    • Watch the heat: too high and sugar burns, too low and apples steam.
    • Always rest the pork; cutting too soon means losing juices.
    • Try apple cider for tang or cream for richness if you want to switch things up.

    🕒Storage, Reheating & Make-Ahead Strategy

    If you’ve got leftovers (lucky you!), store them in an airtight container in the fridge for up to three days. Reheat gently in a covered skillet or oven so the pork stays juicy. Apples can be cooked ahead and reheated separately to keep their texture. Freezing works in a pinch, though the apples may soften more than fresh.

    Variations and Twist Ideas

    One of the best things about comfort food pork chops with caramelized apples is how flexible the recipe can be. Once you’ve nailed the basic method, it’s a breeze to switch up flavors and textures to fit your mood, or even what’s sitting in your pantry.

    • Apple and Onion Version
      Adding onions brings savory depth that balances the natural sweetness of caramelized apples. It’s a rustic spin that makes the dish even more satisfying. Recipes like this apple and onion pork chop skillet show just how perfectly these flavors blend.
    • Apple Cider Cream Sauce
      Want something a little indulgent? After caramelizing your apples, deglaze the pan with apple cider, then stir in a splash of cream. You’ll end up with a silky sauce that clings to every bite of pork.
    • One-Pan Oven Bake
      For a low-effort dinner, arrange pork chops, sliced apples, and onions on a sheet pan. Roast everything together until the chops are done and the apples have caramelized. The beauty here is minimal cleanup and maximum flavor.
    • Herb and Spice Boosts
      Fresh sage, thyme, or rosemary can transform the flavor profile in subtle but powerful ways. Sprinkle herbs over the finished dish for a fragrant lift.
    • Sweet Heat Twist
      Add a pinch of cayenne or red pepper flakes to the apples while caramelizing. The gentle spice cuts through the sweetness, creating a balance that’s bold and unexpected.
    • Nutty Crunch Add-On
      Toast some walnuts or pecans and scatter them over the top right before serving. That extra texture turns a cozy dish into a showstopper.

    What to Serve with Pork Chops and Apples

    Sure, the chops and apples shine on their own, but the right sides can elevate this meal into a full feast. Think of accompaniments that highlight comfort while keeping balance on the plate.

    • Mashed Potatoes or Sweet Potatoes: Creamy, buttery, and the perfect canvas for soaking up pan juices.
    • Roasted Vegetables: Carrots, Brussels sprouts, or parsnips bring earthy sweetness.
    • Green Beans or SautĂŠed Greens: Light, crisp sides that cut through richness.
    • Polenta or Rice Pilaf: A mellow starch that complements without competing.
    • Salad with Vinaigrette: A refreshing contrast to the warm, caramelized flavors.
    • Warm Bread or Rolls: Great for sopping up that apple-infused sauce.

    And if you’re thinking about drinks, apple cider (sparkling or hot) fits like a glove. A crisp white wine or even a light beer pairs well, too.

    Tips for Scaling, Timing & Menu Planning

    Cooking for a crowd? No problem. Here’s how to pull it off without breaking a sweat:

    • Scaling Up: Simply double or triple the recipe, but don’t overcrowd the pan, use two skillets or work in batches.
    • Timing: Apples cook faster than pork, so start chops first, then caramelize apples while the meat rests.
    • Make-Ahead: Cook apples earlier in the day and reheat just before serving; this keeps stress low during dinner prep.
    • Dinner Party Trick: Finish the chops in the oven while you entertain guests. Apples can be reheated on the stovetop in minutes.

    ❓Frequently Asked Questions (FAQs)

    Q: What internal temperature should pork chops reach?
    A: Always cook pork chops to 145°F (63°C), then let them rest for at least three minutes. This keeps them juicy and safe to eat.

    Q: Can I use any type of apple, or do they all caramelize well?
    A: Firm, tart apples like Granny Smith or Honeycrisp work best because they hold their shape. Softer varieties like McIntosh tend to collapse into applesauce.

    Q: Can I make this dish ahead or reheat it later?
    A: Absolutely! Pork chops reheat best when covered and warmed gently in the oven. The apples can be cooked ahead and reheated separately to maintain texture.

    Q: Can I skip the sugar when caramelizing apples?
    A: You can reduce or omit sugar if you prefer. The apples themselves have natural sweetness, though brown sugar adds depth and helps with caramelization.

    Q: How do I adapt this recipe for thicker bone-in chops?
    A: Sear them as usual, then finish in the oven until they reach the correct temperature. Keep apples on the stovetop, then combine just before serving.

    Note: For more informations on nutrition, visit the website: nutrition.gov

  • Easy Raspberry Swiss Roll Cake with Cream Filling

    Easy Raspberry Swiss Roll Cake with Cream Filling

    Introduction

    If you’ve ever wanted to impress your guests with a dessert that’s as beautiful as it is delicious, look no further than the Raspberry Swiss Roll Cake. This light, airy sponge cake filled with fluffy whipped cream and vibrant raspberry jam is a showstopper at any gathering. Its delicate swirl and burst of fruity flavor make it perfect for holidays, birthdays, tea parties, or even as a weekend baking project to treat yourself.

    The beauty of this recipe lies not only in its elegant presentation but also in its simplicity. Many people think a Swiss roll is tricky to make, but with a few key techniques and some patience, you’ll be able to create a bakery-worthy dessert right in your own kitchen. The sponge is soft, spongy, and flexible enough to roll without cracking, while the filling strikes the ideal balance between sweet and tart thanks to the fresh raspberry jam. Topped with a light dusting of powdered sugar and a few extra raspberries, it’s a dessert that tastes just as good as it looks.

    What makes the Raspberry Swiss Roll Cake especially appealing is how versatile it can be. Swap the raspberry jam with strawberry, blueberry, or even a chocolate spread for a fun twist. This recipe also offers a fantastic opportunity to practice classic baking techniques like whipping egg whites to stiff peaks and rolling sponge cakes while warm. Don’t be intimidated, once you master it, you’ll want to bake this stunning roll again and again.

    Whether you’re serving it for family gatherings or simply want to brighten up your dessert table, this cake delivers the “wow” factor every time. Ready to learn how to make it step by step? Let’s get baking!

    Raspberry Swiss Roll Cake ingredients

    Easy Raspberry Swiss Roll Cake

    Recipe by Cindy
    0.0 from 0 votes
    Course: DessertCuisine: EuropeanDifficulty: Easy
    Servings

    10

    slices
    Prep time

    20

    minutes
    Cooking time

    12

    minutes
    Calories

    300

    kcal

    Ingredients

    • 4 large eggs, room temperature

    • ½ cup granulated sugar

    • ½ cup all-purpose flour

    • Âź tsp baking powder

    • Âź tsp salt

    • 1 tsp vanilla extract

    • ž cup raspberry jam (or preserves)

    • 1 cup heavy cream, chilled

    • 2 tbsp powdered sugar (plus extra for dusting)

    • Fresh raspberries, for garnish

    Directions

    • Preheat oven to 350°F (175°C). Line a 10×15-inch jelly roll pan with parchment paper.
    • Beat eggs and sugar until pale, thick, and tripled in volume (about 5–7 minutes). Add vanilla.
    • Sift in flour, baking powder, and salt. Gently fold until combined.
    • Spread batter evenly in the pan. Bake 10–12 minutes until springy.
    • Remove and immediately roll cake (with parchment) into a log. Let cool.
    • Whip cream with powdered sugar until fluffy.
    • Carefully unroll cooled cake. Spread jam evenly, followed by whipped cream.
    • Roll cake back up gently. Dust with powdered sugar and garnish with fresh raspberries.
    • Slice and serve.
    Raspberry Swiss Roll Cake

    Tips for Success

    The key to a perfect Raspberry Swiss Roll Cake is in the sponge. Make sure to beat the eggs and sugar long enough, they should be thick and ribbon-like, which gives the cake its signature airy texture. Roll the cake while it’s still warm to prevent cracks. Also, don’t overload the filling; a thin layer ensures it rolls neatly without squeezing out.

    🍷 Serving Suggestions

    This elegant cake pairs beautifully with a cup of tea, coffee, or even a glass of sparkling wine for a celebratory touch. For a summery vibe, serve with a scoop of vanilla ice cream or a drizzle of raspberry coulis on the side.

    🥡 Storage and Reheating Tips

    Wrap leftover cake tightly in plastic wrap and refrigerate for up to 3 days. For the freshest taste, slice only when serving. Avoid freezing, as the whipped cream filling may separate.

    ❓ Frequently Asked Questions

    Can I make this ahead of time? Yes, you can prepare it a day in advance, just keep it well wrapped in the fridge.
    What if my cake cracks while rolling? Don’t worry, dust with powdered sugar or cover with whipped cream, and it will still look beautiful.
    Can I use frozen raspberries for garnish? Fresh is best for presentation, but thawed raspberries work for flavor.

    Note: For more informations on nutrition, visit the website: nutrition.gov